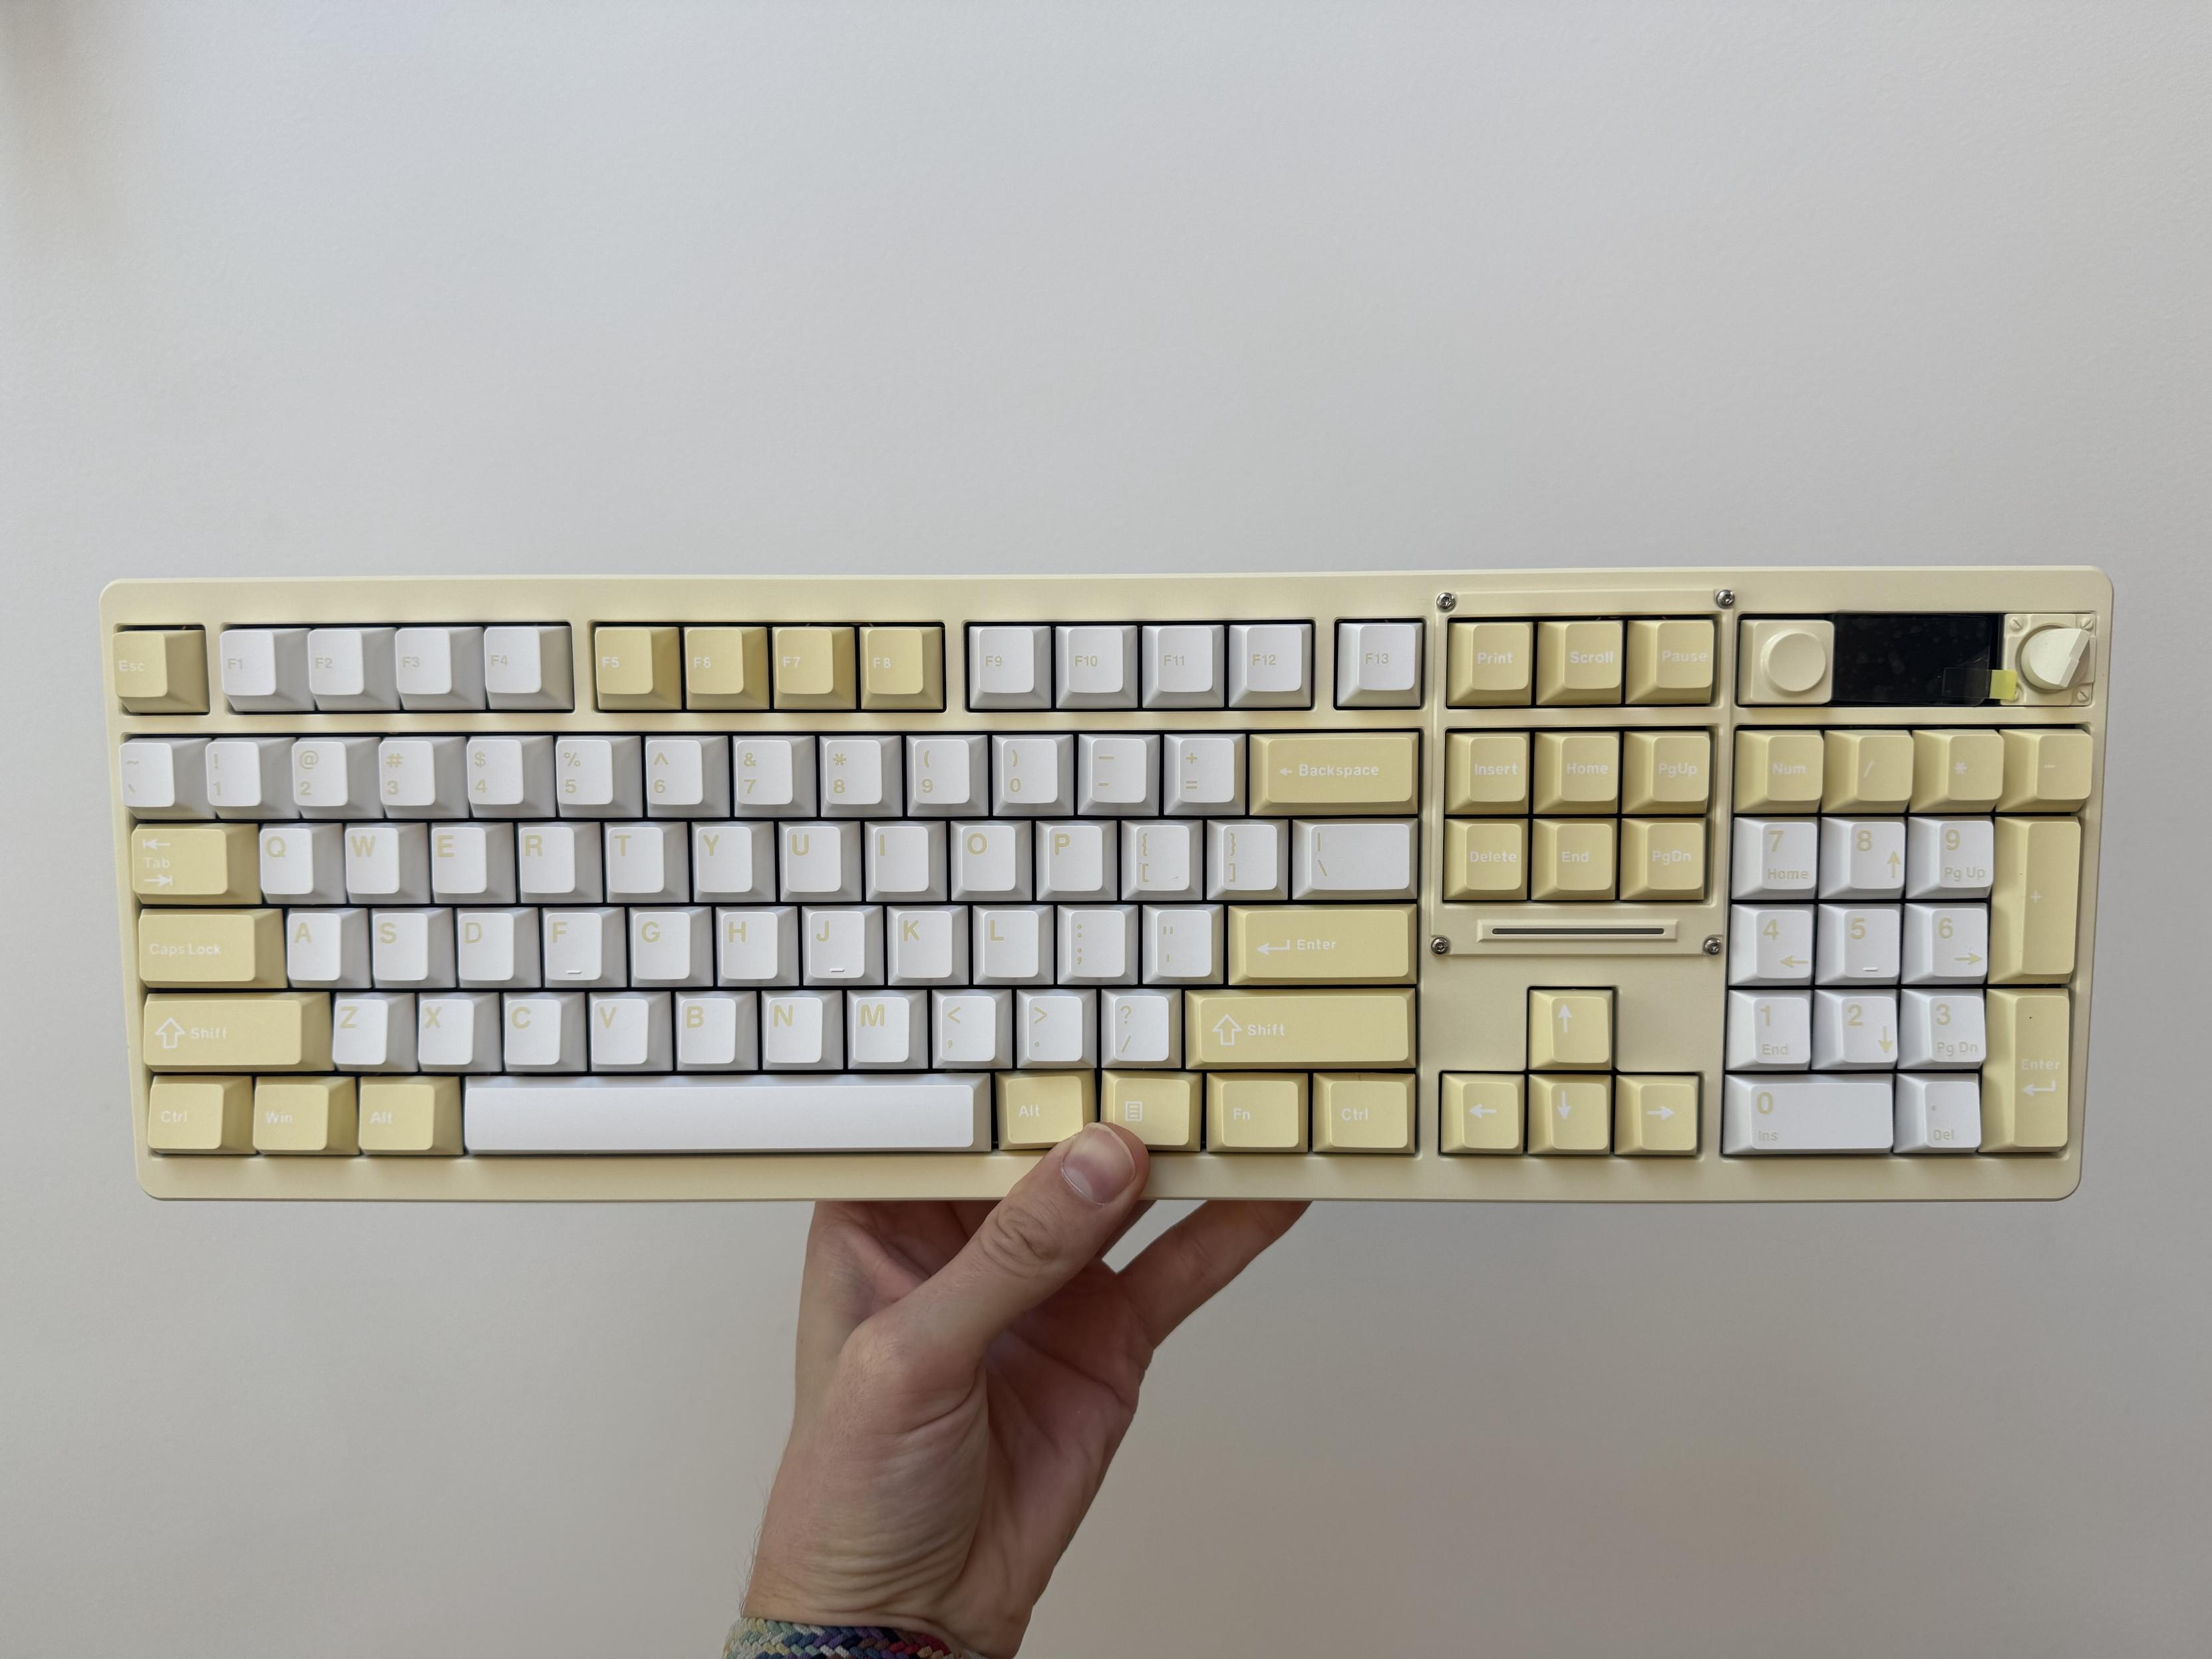
Chilkey ND104 full-sized mechanical keyboard
I can count on one hand the number of times I’ve tested a full-sized mechanical keyboard. The reasons for this are three-fold; I don’t need or use one, my desk is too cramped anyway, and decent ones are surprisingly rare.
Chilkey aims to solve the latter of these problems with the ND104, a much-appreciated, cost-effective entry into the big-boy keyboards sector to liberate folks from a choice of Keychron, Ducky and not much else. They kindly supplied me a pre-release Lumen Yellow one with no real suggestion as to what I should do with it- so here’s a review.
Who needs weights when you have keyboards!
With ND104 Chilkey have delivered an almost uncomplicated design from the top, marred only by a slightly weird screw-on faceplate around the navigation cluster, and fake screw detail around the knob. Underneath, though, are left and right underlights and a graceful curved foot that leaves about 4cm at each end and 2cm along the back edge. While the board is still thick – running a consistent 2cm from front to back – this inset foot gives it a sleek side-on profile. More importantly, perhaps, it keeps the weight down. This is such a beast they had a spot of trouble shipping it (and another hefty board) to me!
As the name suggests the ND104 is a 104 key board… wait! Sorry, it has 105 keys? Well 106 if you count the Calculator key, and apparently configurable up to 109 if you sacrifice the LCD and knob. Though the parts you need to do this are not included by default.
Build
ND104 is another solid aluminium build, comprising a main top and bottom shell – held together with spring-loaded ball catches – and a few extra sundry details. The trim around the knob, for example, is a decorative piece screwed in from underneath. The navigation cluster has a slightly awkward screw-in plate around it (which I don’t like), with ugly non-colour matched screws. Underneath is a raw machined aluminium badge, complete with a pattern of tool marks. It’s not my favourite style, I’d prefer something a bit less busy, but it works.
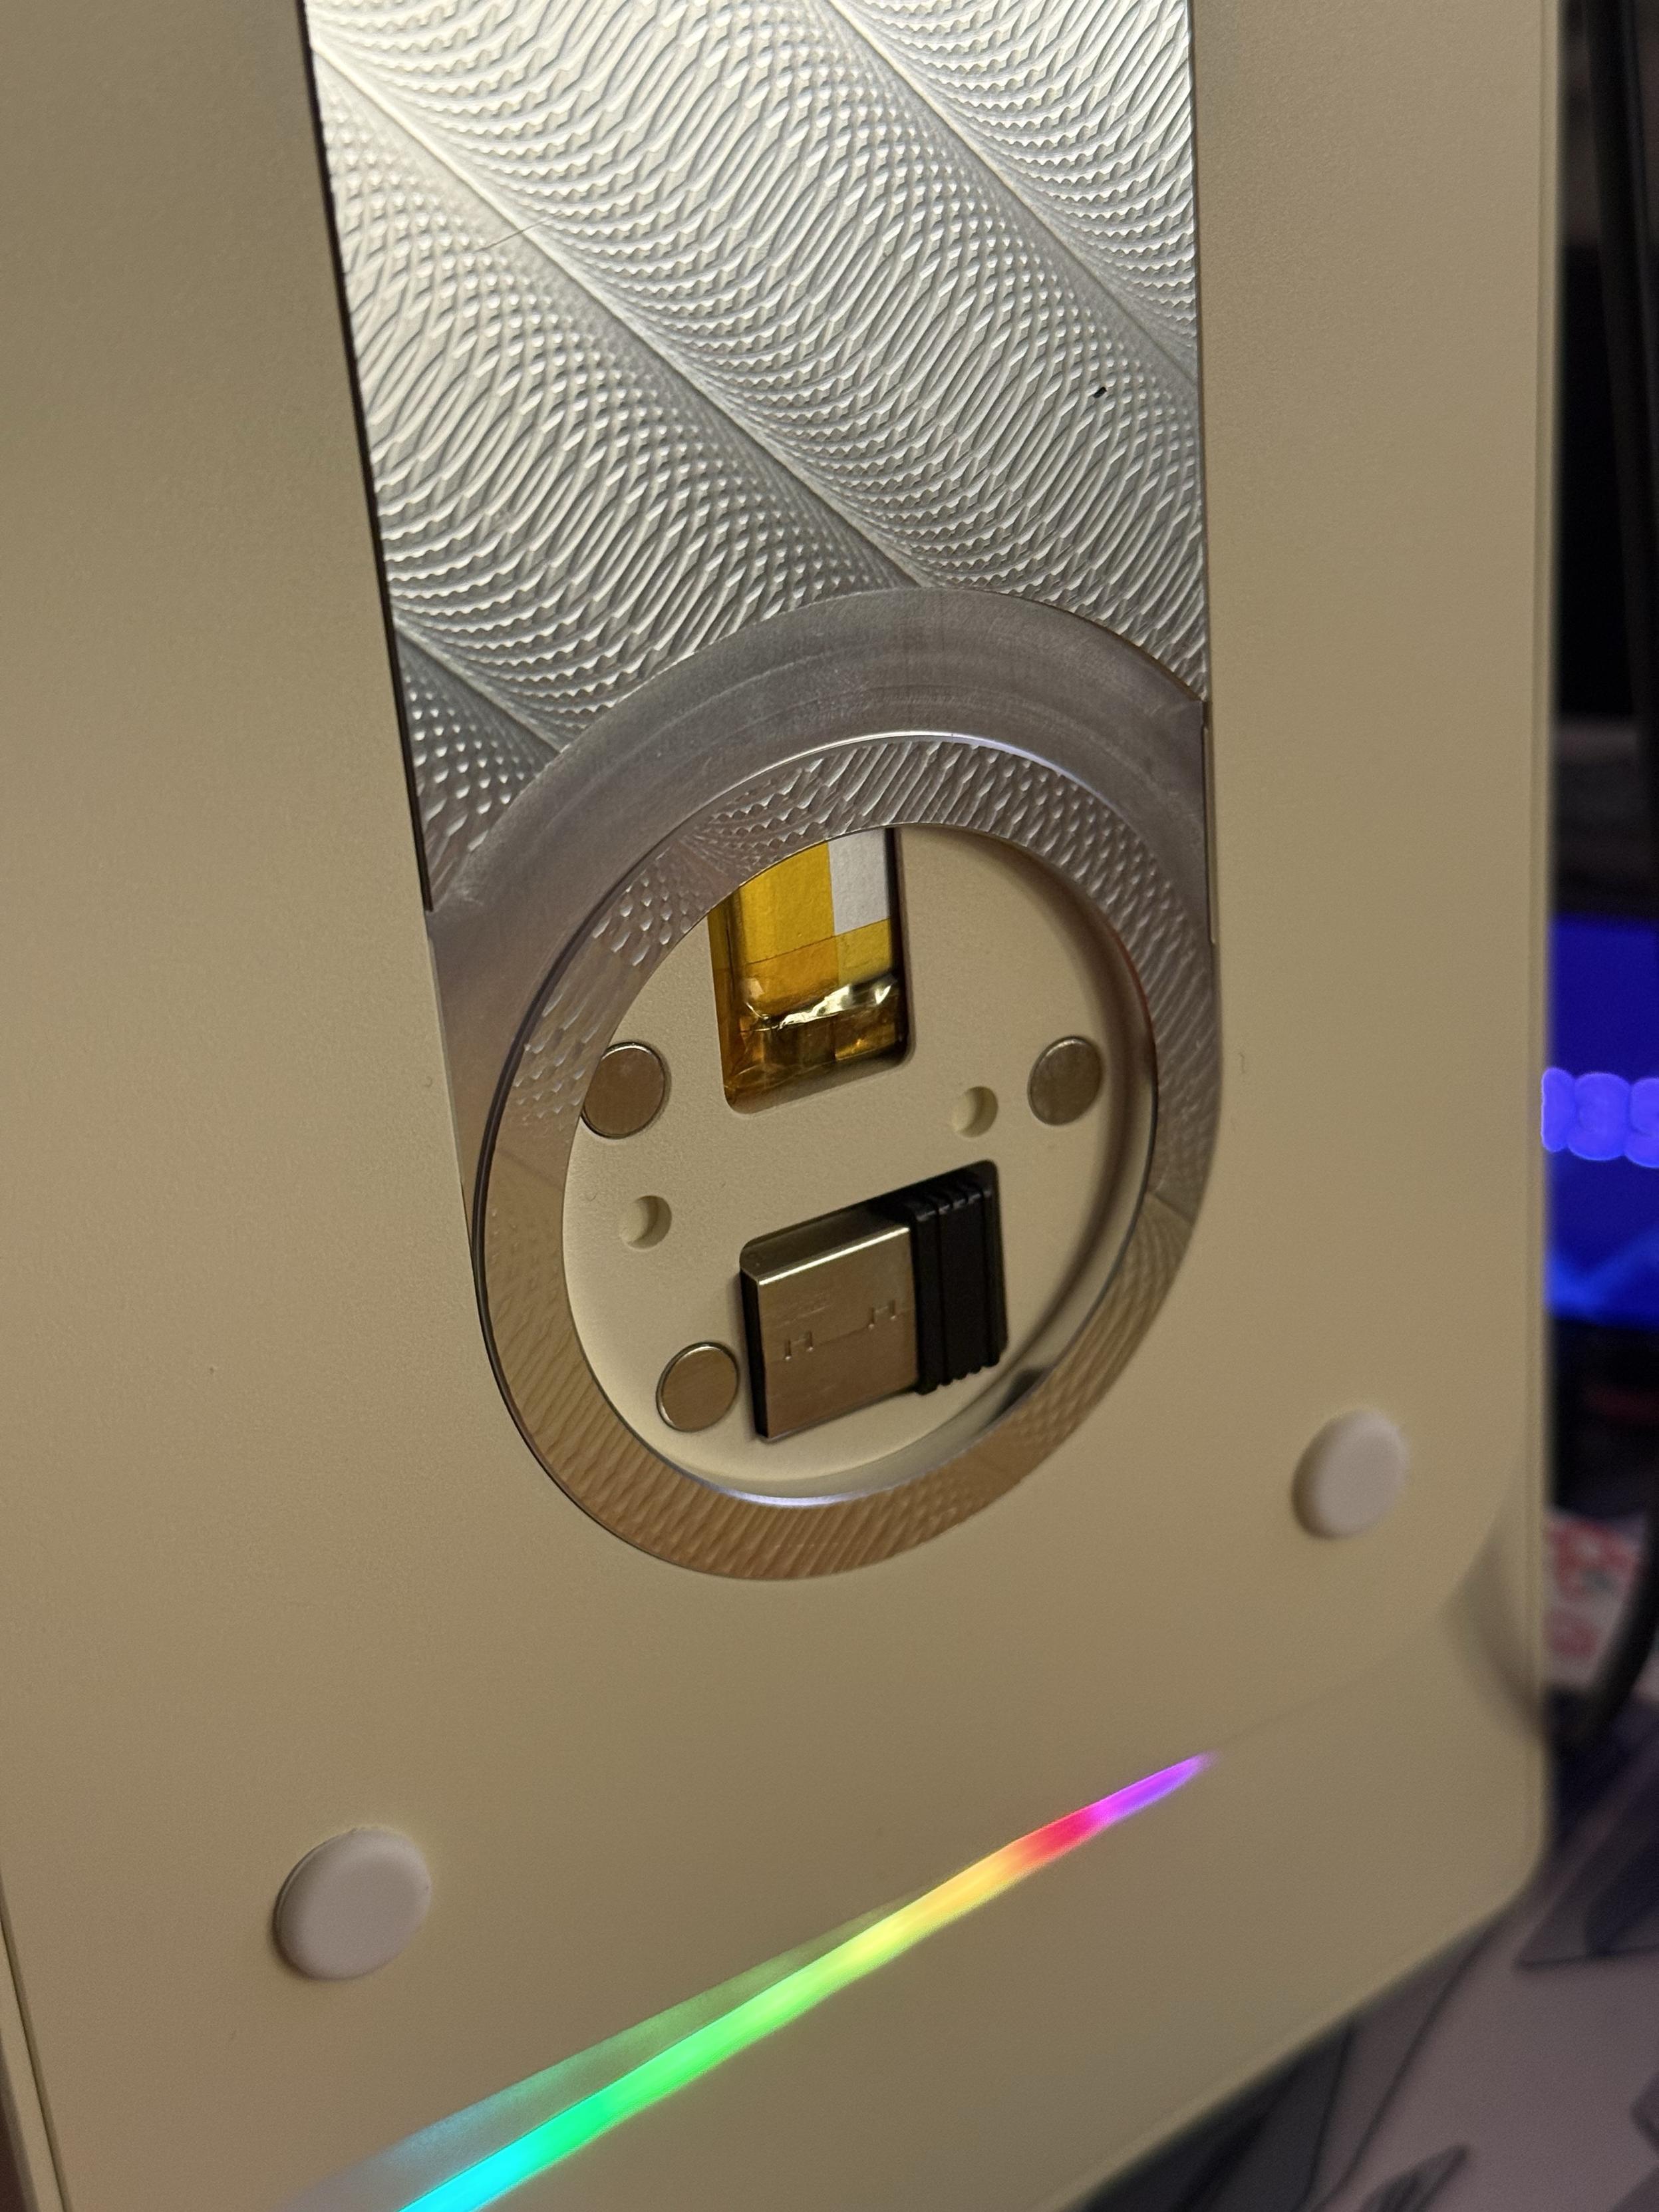
A little circular badge detail on the bottom levers up to reveal the USB dongle- a nice detail borrowed from the likes of Zoom65!
The badge also has a nested case-coloured circular bit, held in with magnets. This levers out with a push on one side and reveals a super handy slot for storing the USB (2.4GHz) dongle. There are four small silicone feet that stand the ND104 off the desk. They are – incredibly – push-fit silicone rather than using adhesive. More of these, please Chilkey!
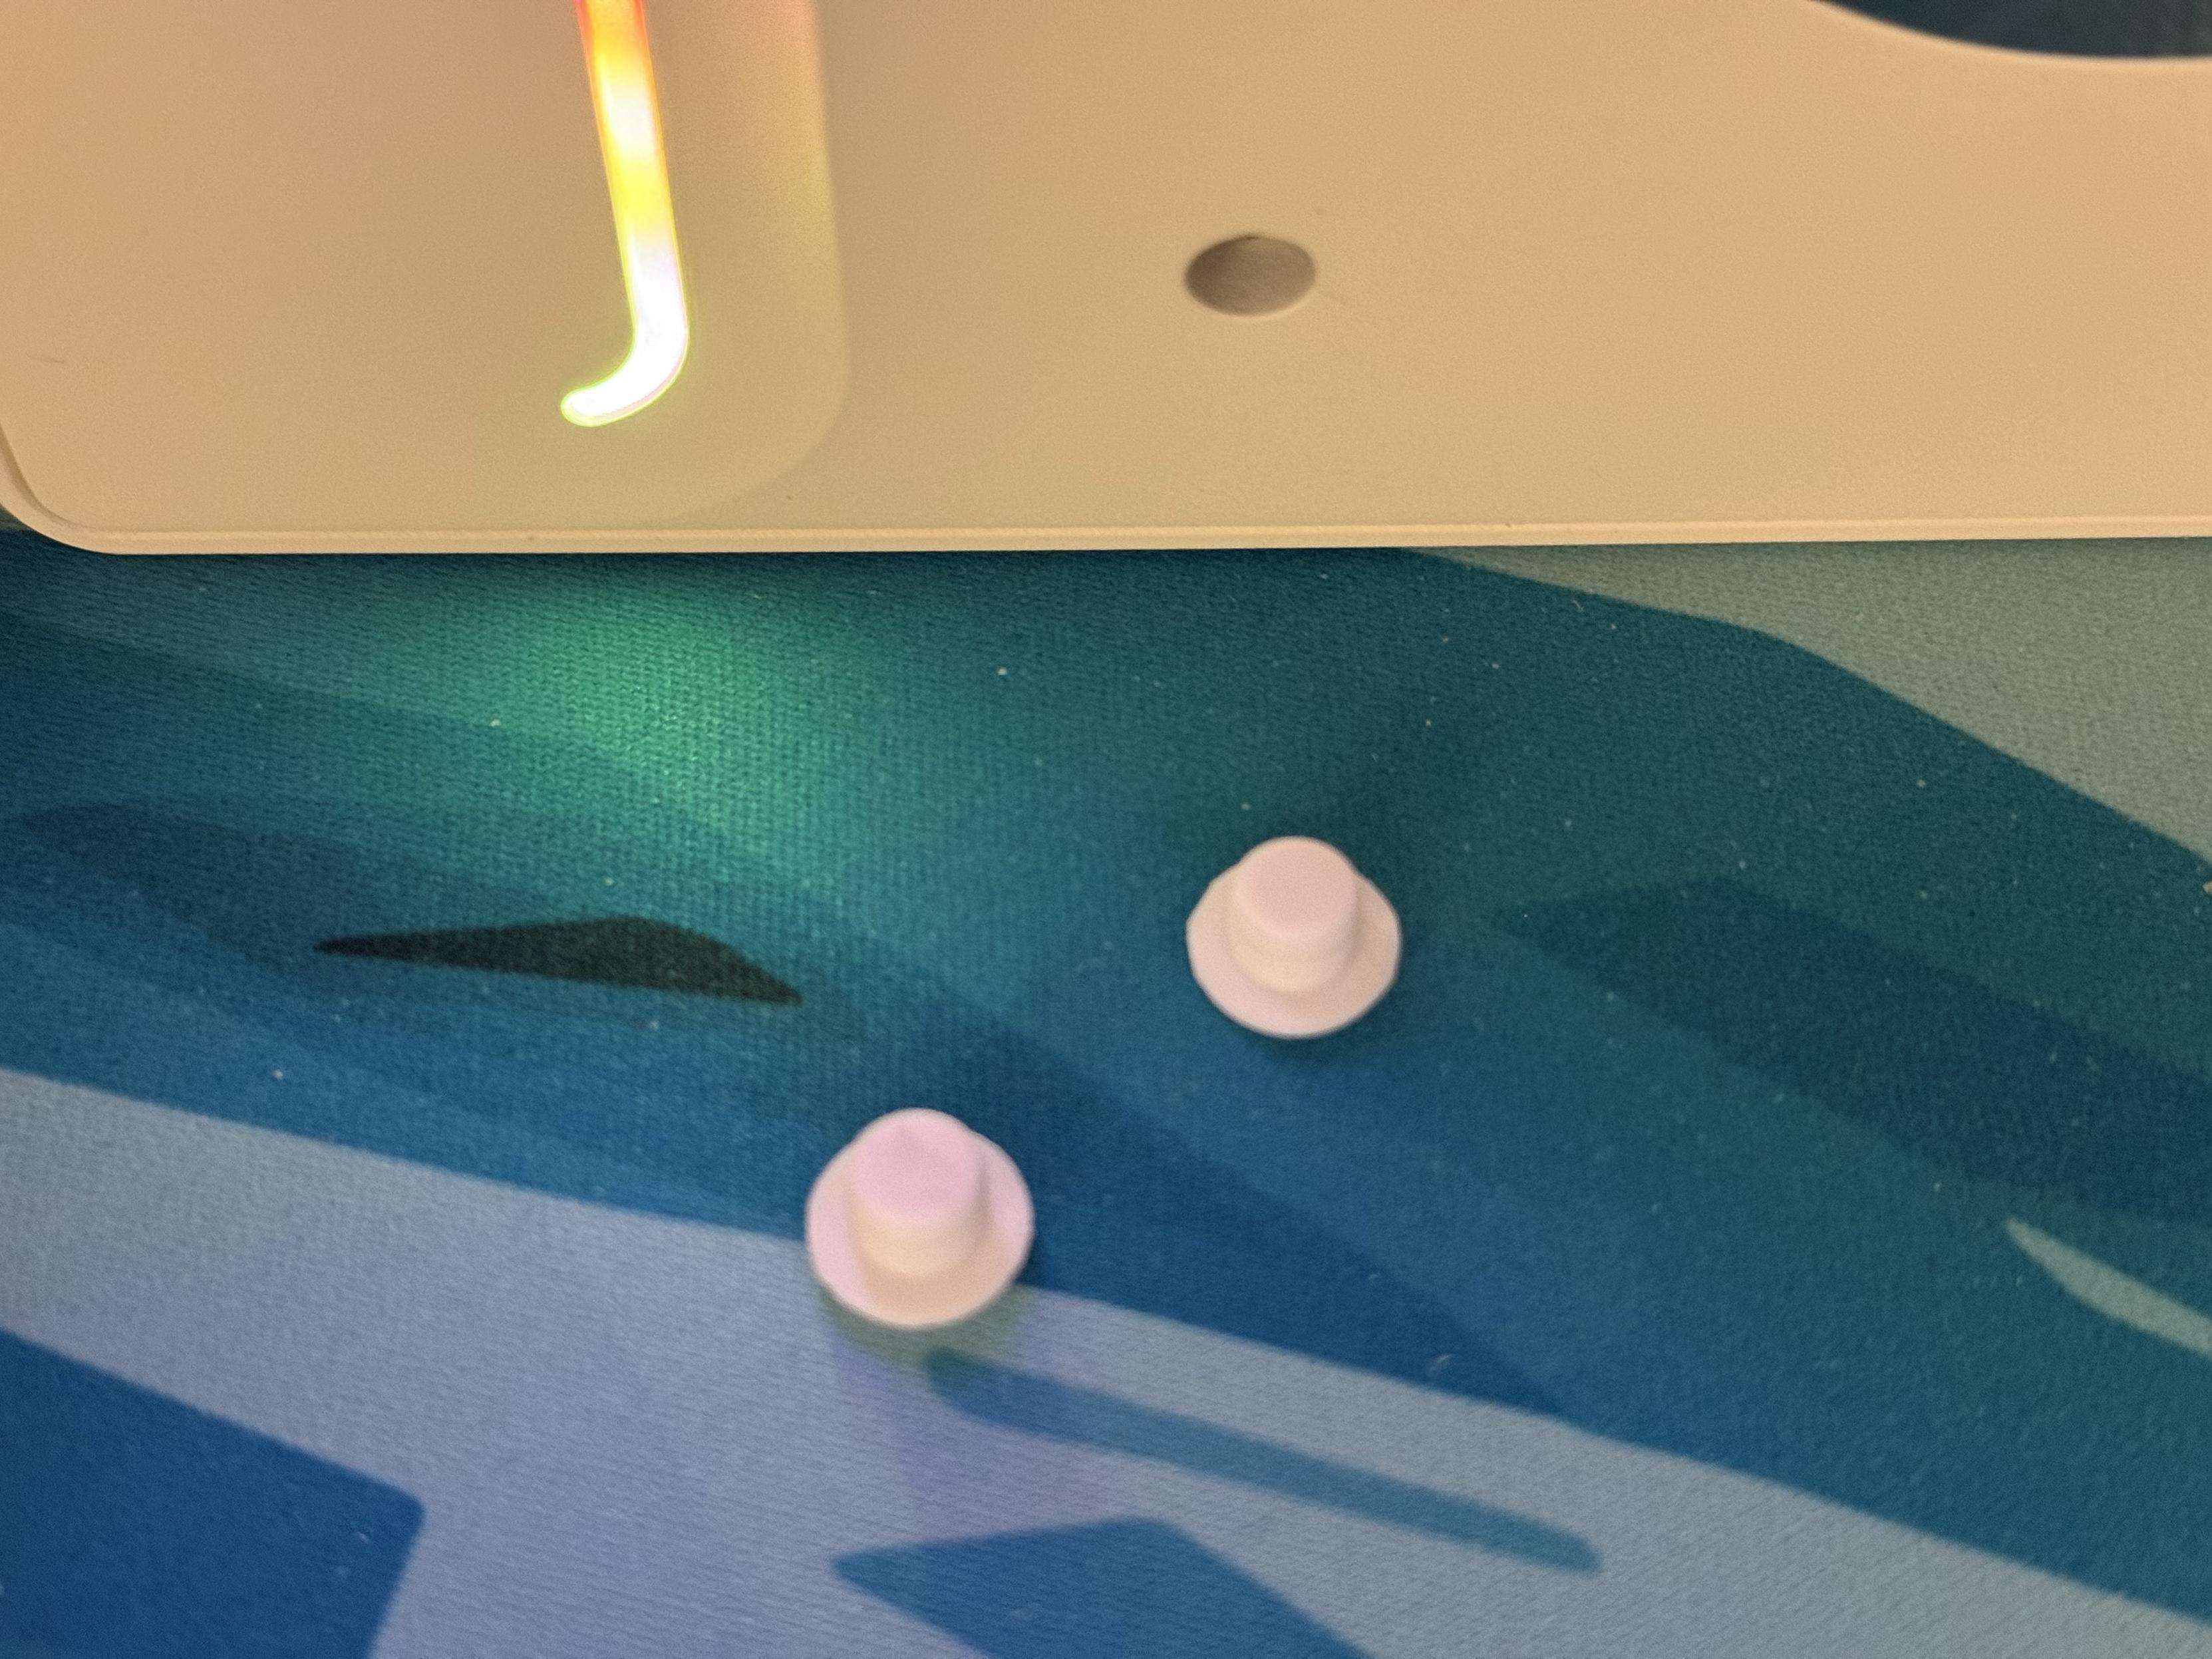
Little push fit silicone feet! Now where were these in the Slice68!!!!
Aesthetically the ND104 is mostly hit, but I would absolutely drop the calculator button for a dedicated, full-height keycap, replace the knob with a nice knurled one, remove the fake screw-head detail around it, and remove the faceplate around the navigation cluster. A minimalist, sleek top would match the clean, sleek lines underneath the board and really give it that tidy professional look. A push-fit silicone diffuser would work. I don’t begrudge Chilkey having a little visual identity here, but sometimes less is more.
ND104 is a joy to type on. The stock, tactile switches – intended to appeal to office users and typists rather than gamers – feel and sound great and the spacebar is as crisp as I could hope for in a pre-build. The colour matched keycaps are decent enough, but there are a couple – in particular my D key – where the double-shot moulding process doesn’t seem to have been quite as controlled as it should be. In simple terms- the legend is slightly recessed from the top surface of the key. On others, such as M, it’s a little blown out. None of this is detectable with a fingertip, though a nail can snag the edges of the recessed legends. Since the ND104 is a full-sized complete at such a keen price, something had to give and it was definitely the keycap quality.
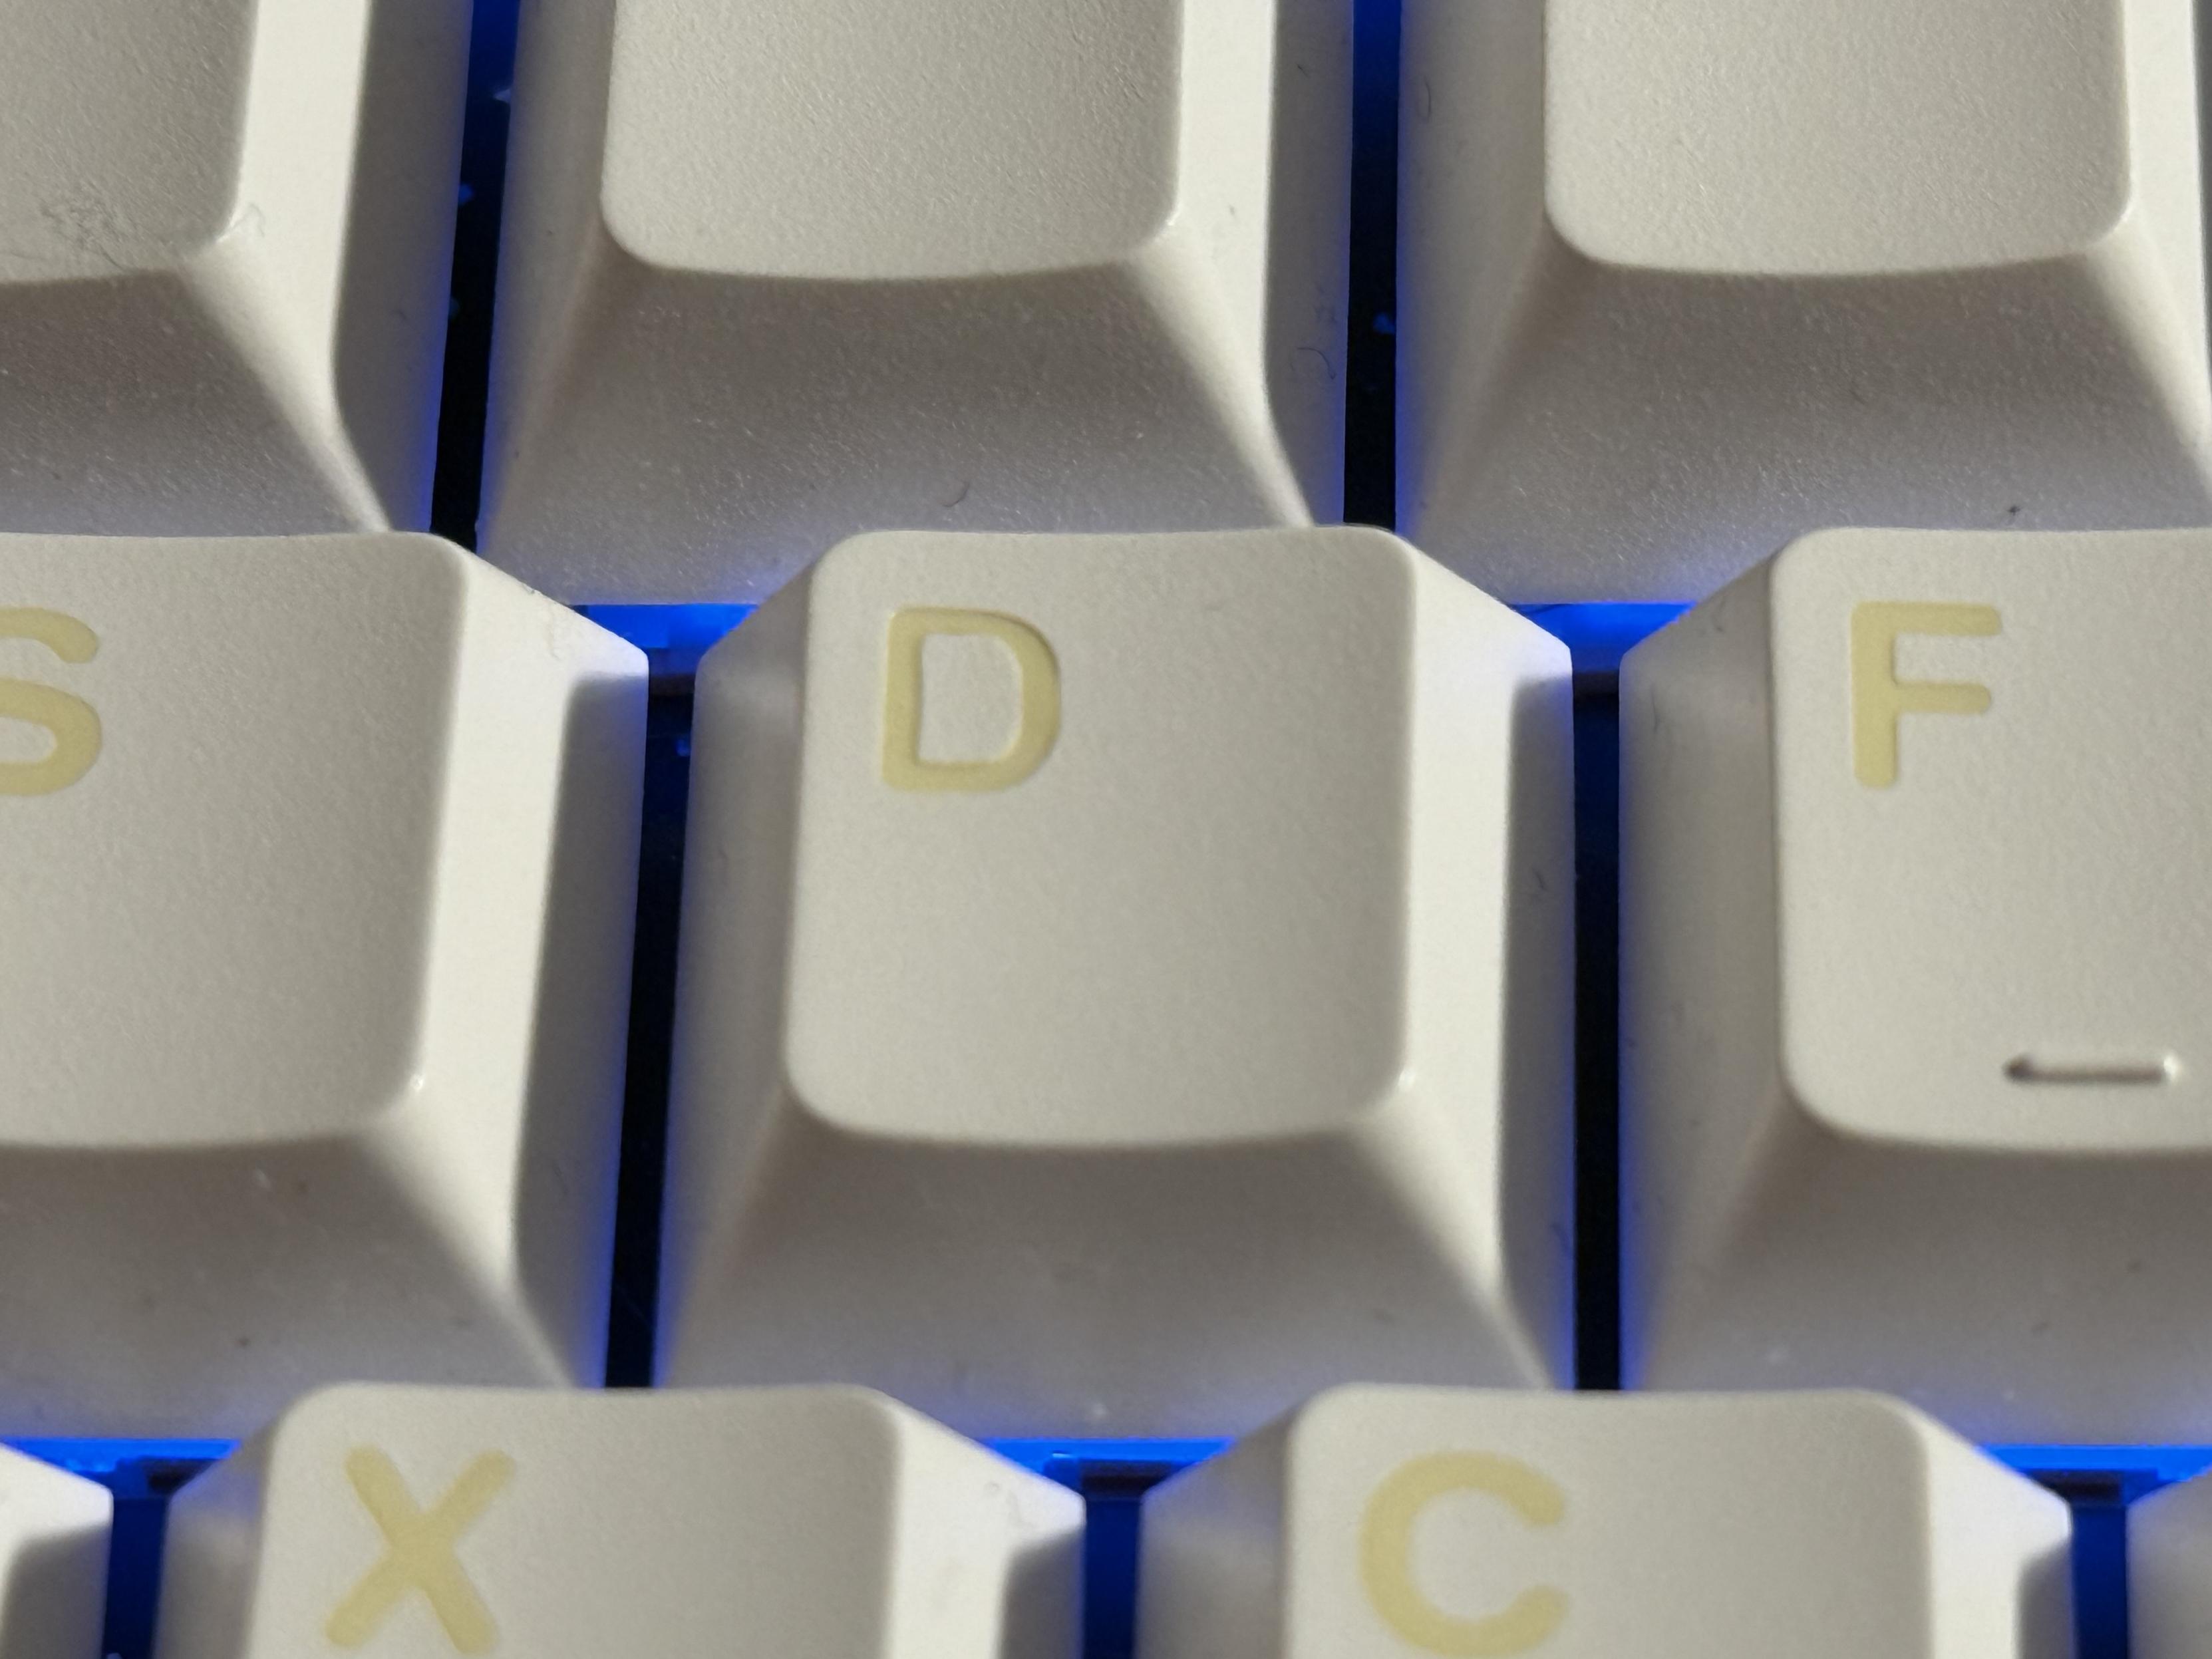

The keycaps for the ND104 aren’t perfect, with the double-shot moulding being under or overcooked on a couple of caps.
I would have also appreciated a handful of extra switches and keycaps for replacing the LCD and knob modules with regular keys. Plus some alternatives for macOS vs Windows. That said, the yellow on white and white on yellow legends on my particular choice of colour (Yellow as all heck) are so low contrast that they’re almost blank, so what would it matter. I also had fun using KAM Playground symbols in lieu of the calculator button, LCD and knob.
Swapping out the LCD and knob for switches and keycaps is super easy, though parts are not supplied!
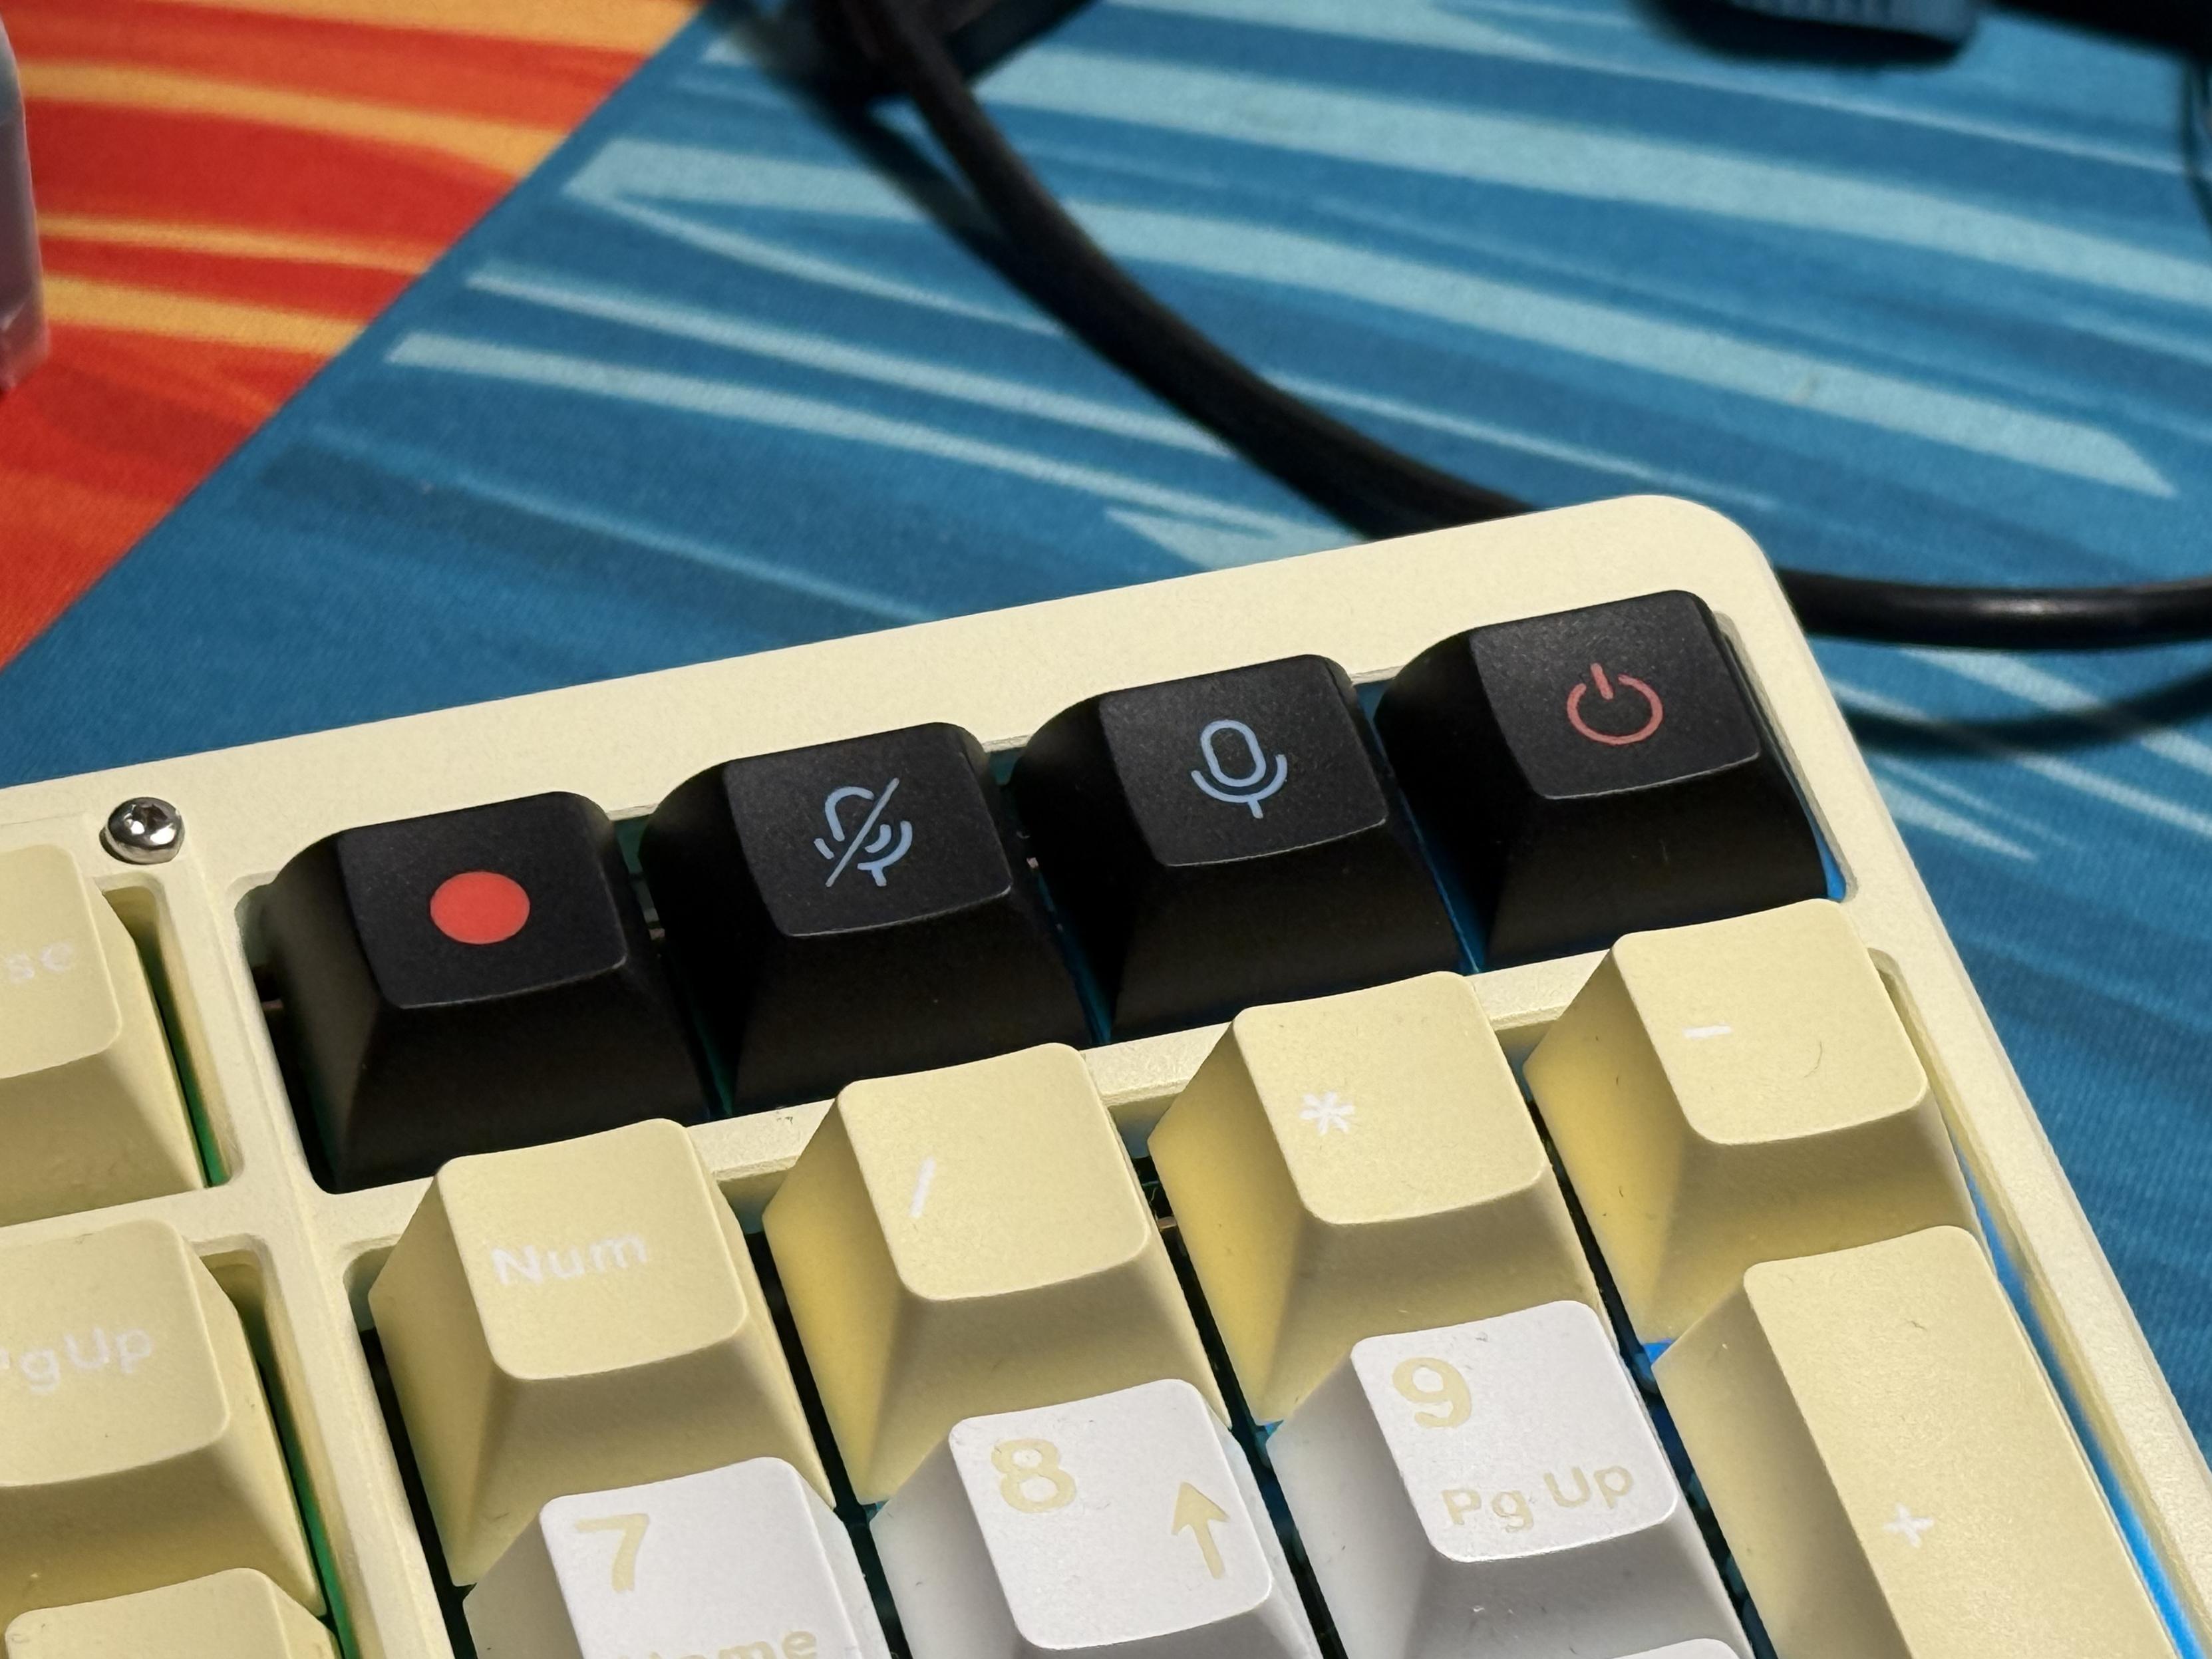
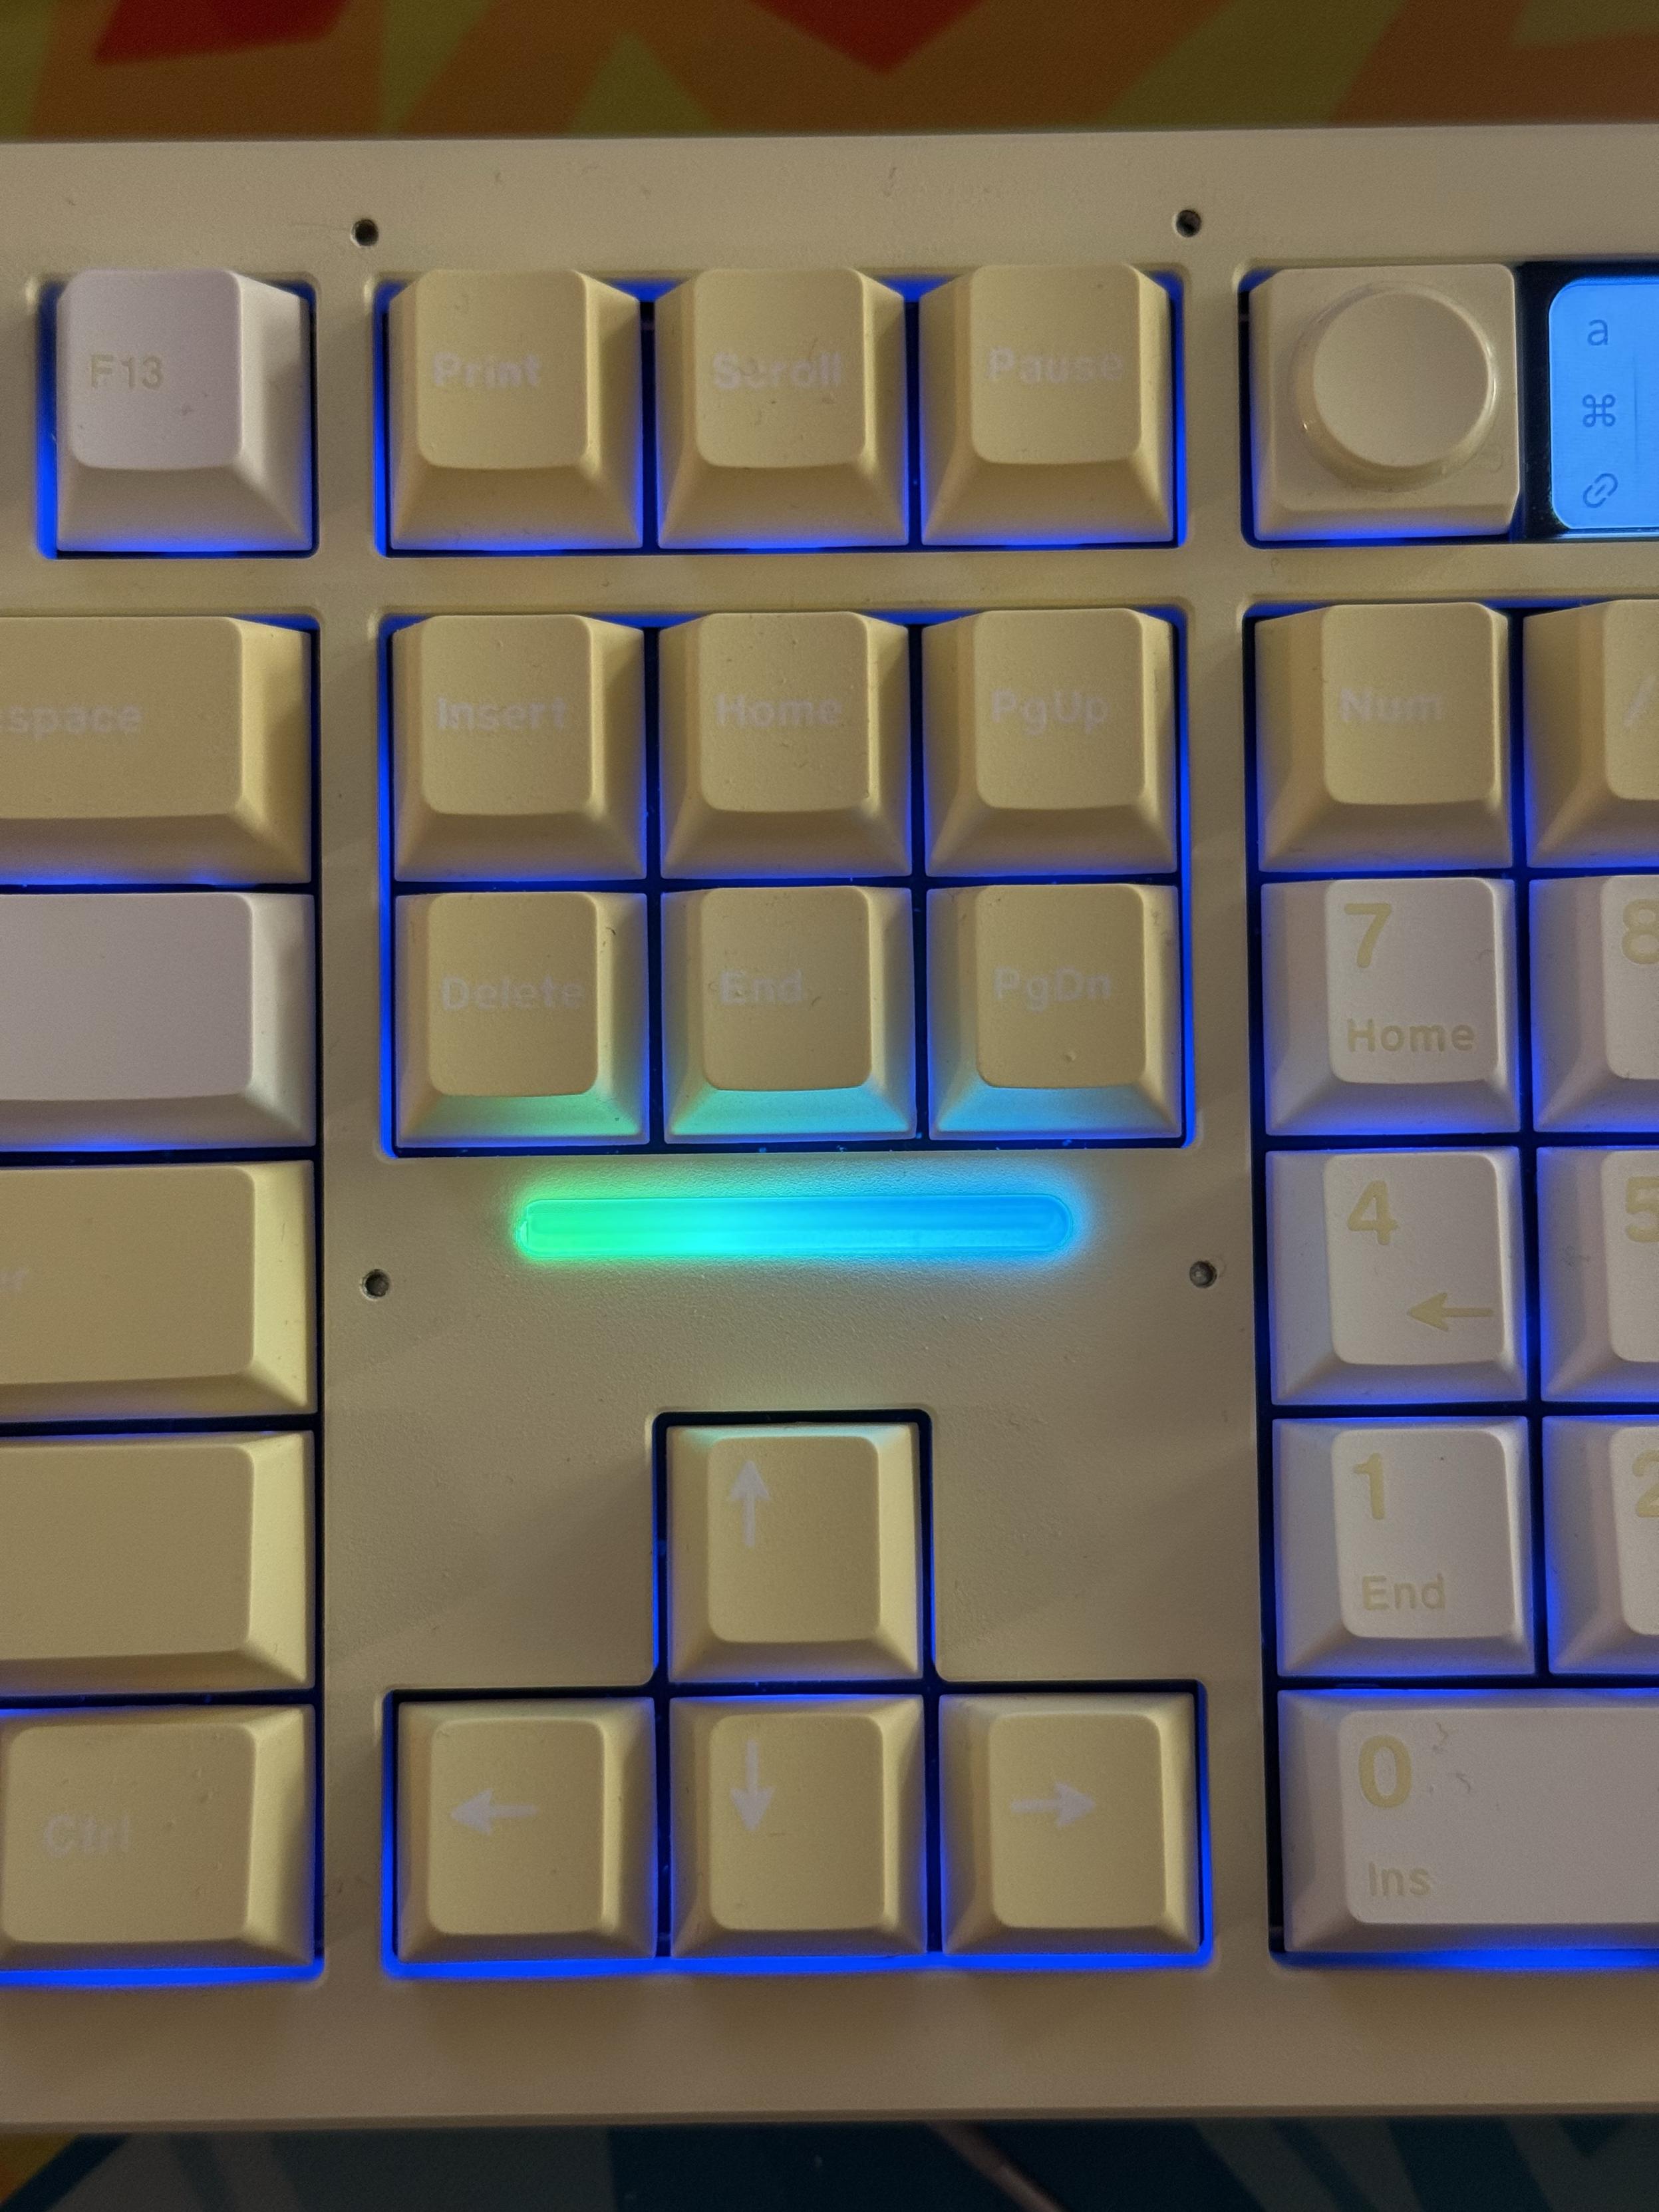
What the keyboard does come with – apart from some widgets for different mounting styles – is a little rubber insert you can choose to push into the board in place of the navigation cluster. I’m not a fan of this, but it’s a thing that exists and thus I am obliged to at least mention it.
Entirely pointless or more useful than the navigation cluster?
Teardown
The ND104, like the ND75, is held together with ball catches making separating the top and bottom half of the board – almost – a breeze. Before attempting disassembly the knob must be unscrewed (it has a little grub screw holding it in place, a curious detraction from the friction fit ones I tend to see) and removed. Thankfully a little allen key is supplied for this, though I appear to have made short work of losing mine.
With the knob removed – I did eventually find my allen key – lifting off the top half of the board is a case of bracing against the keys with your thumb and pulling it upwards at the back edge, then repeating for the front edge. This releases the six ball catches, three each along the front and back, and since the LCD has pogo pins (spring loaded metal pins for electrical connections) it pulls away without snagging any ribbon cables.
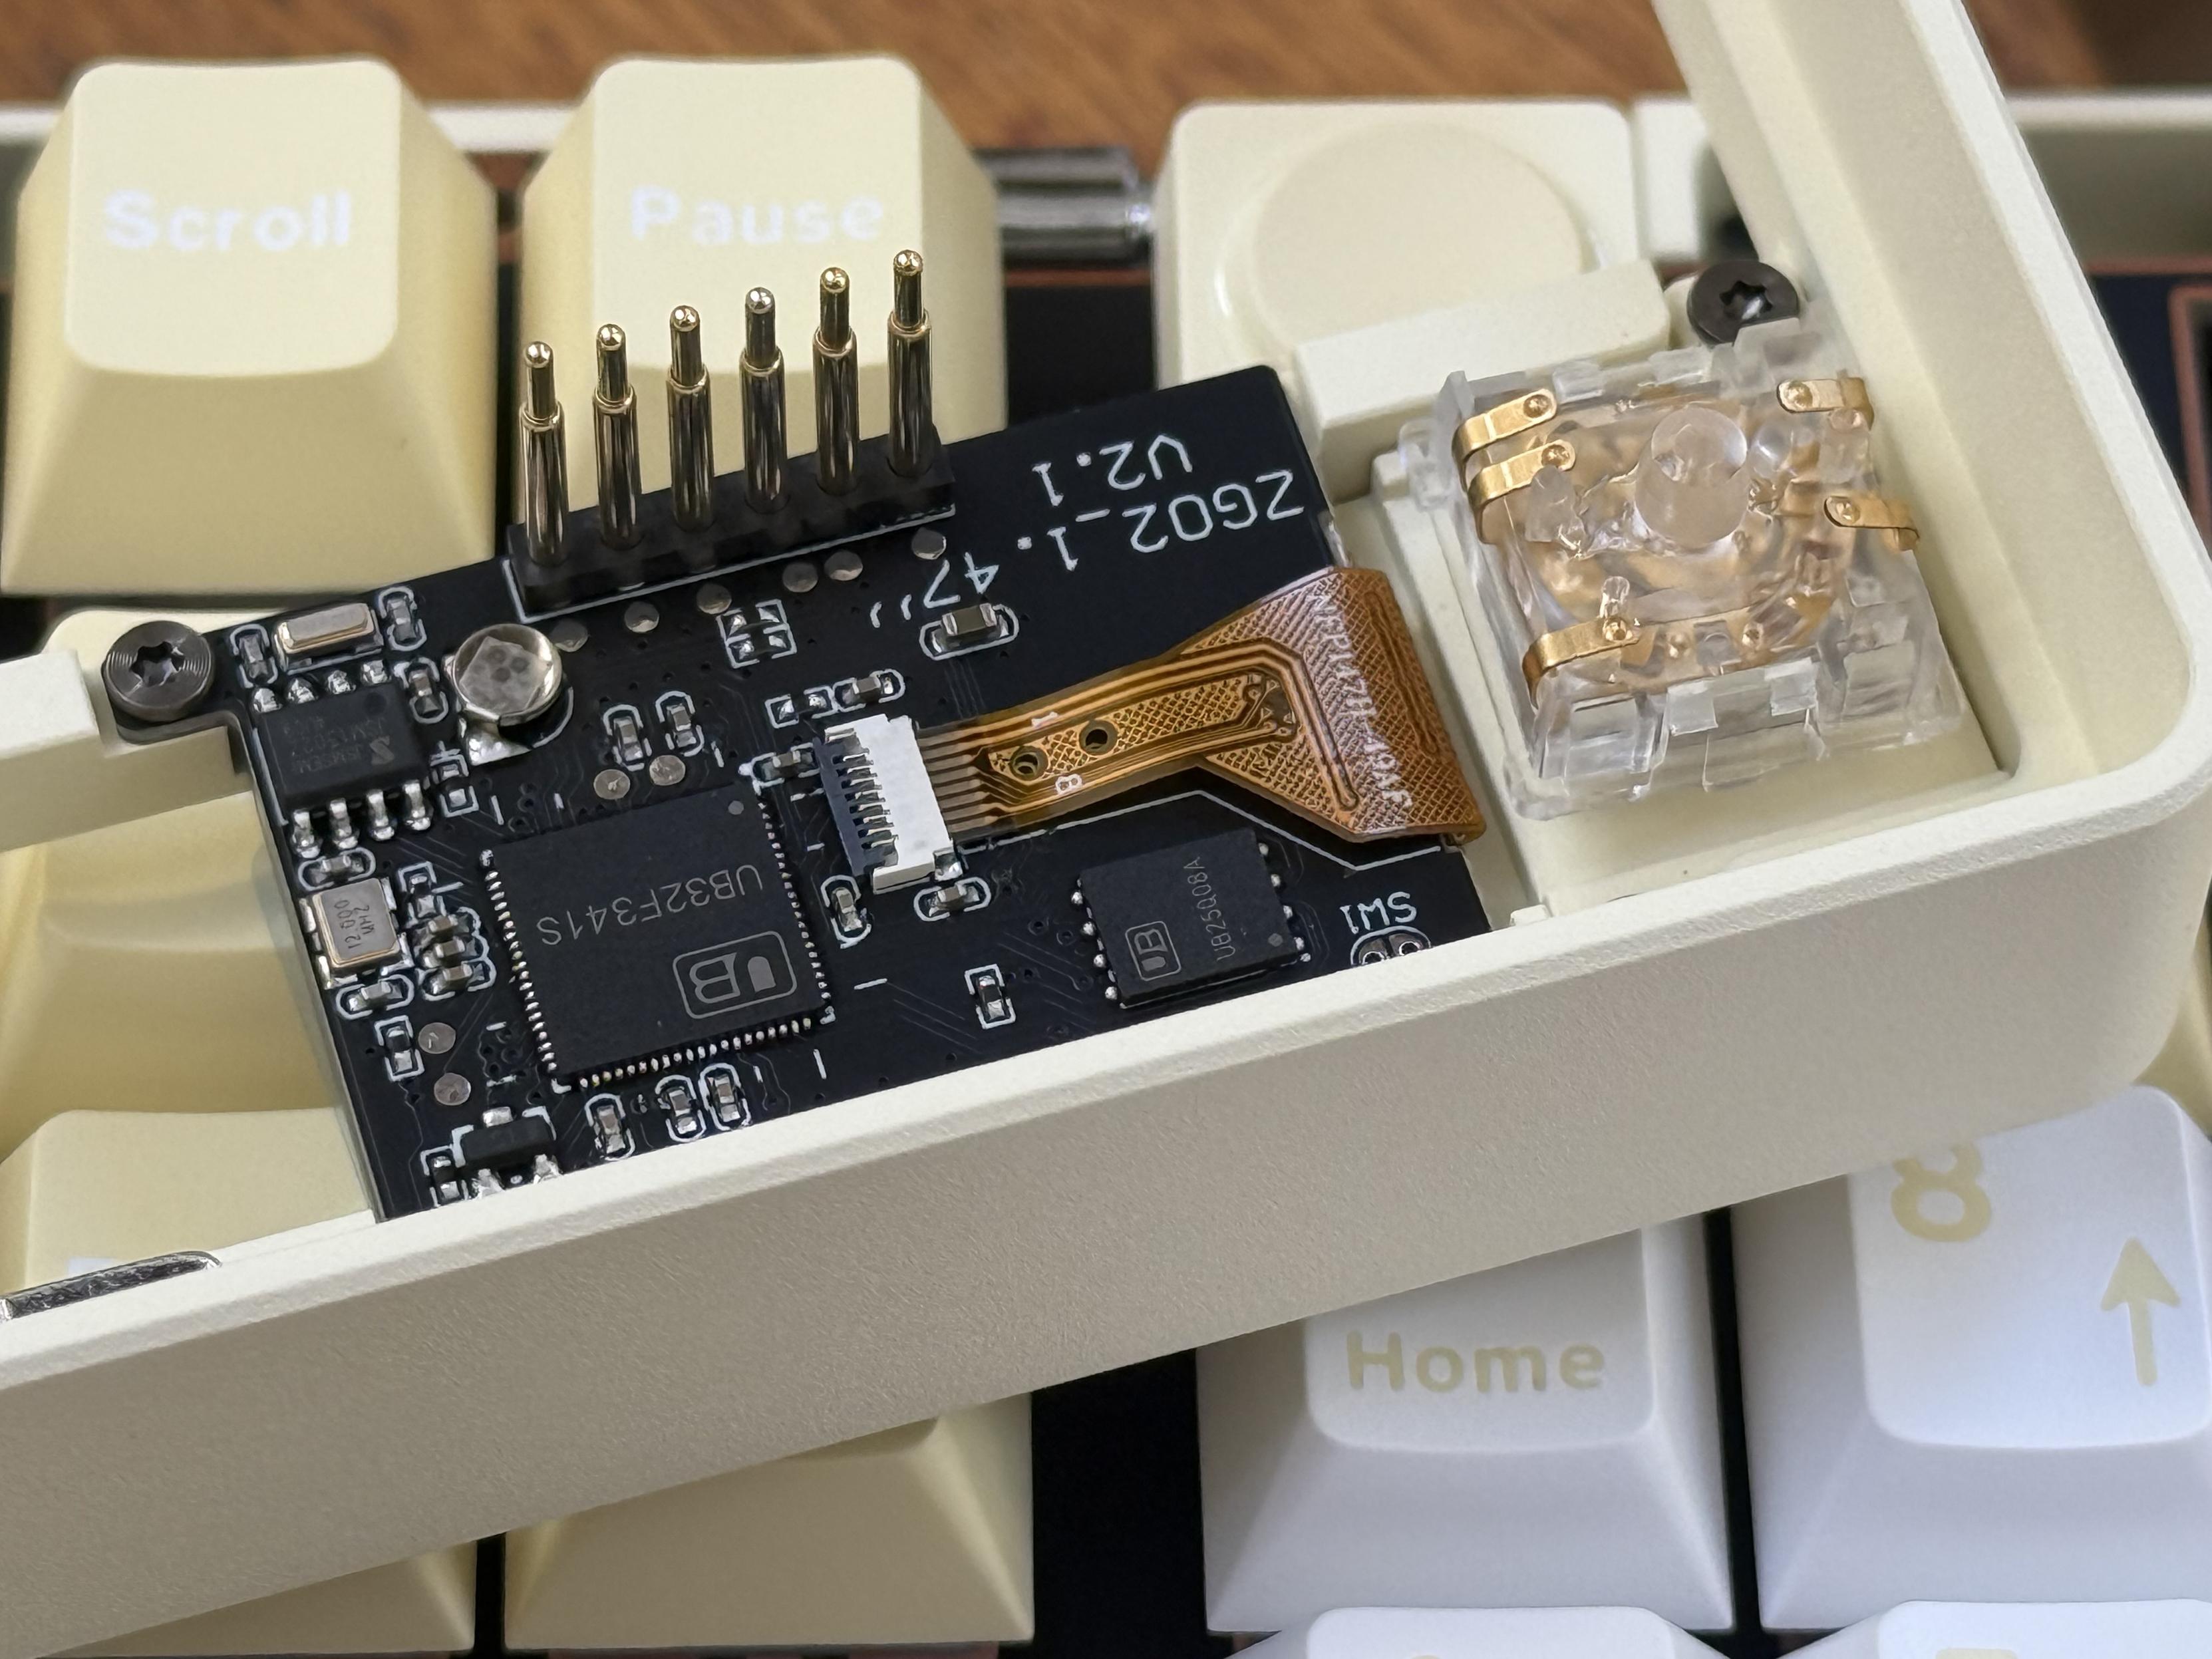
The LCD and encoder both use their own flavour of sprung contacts.
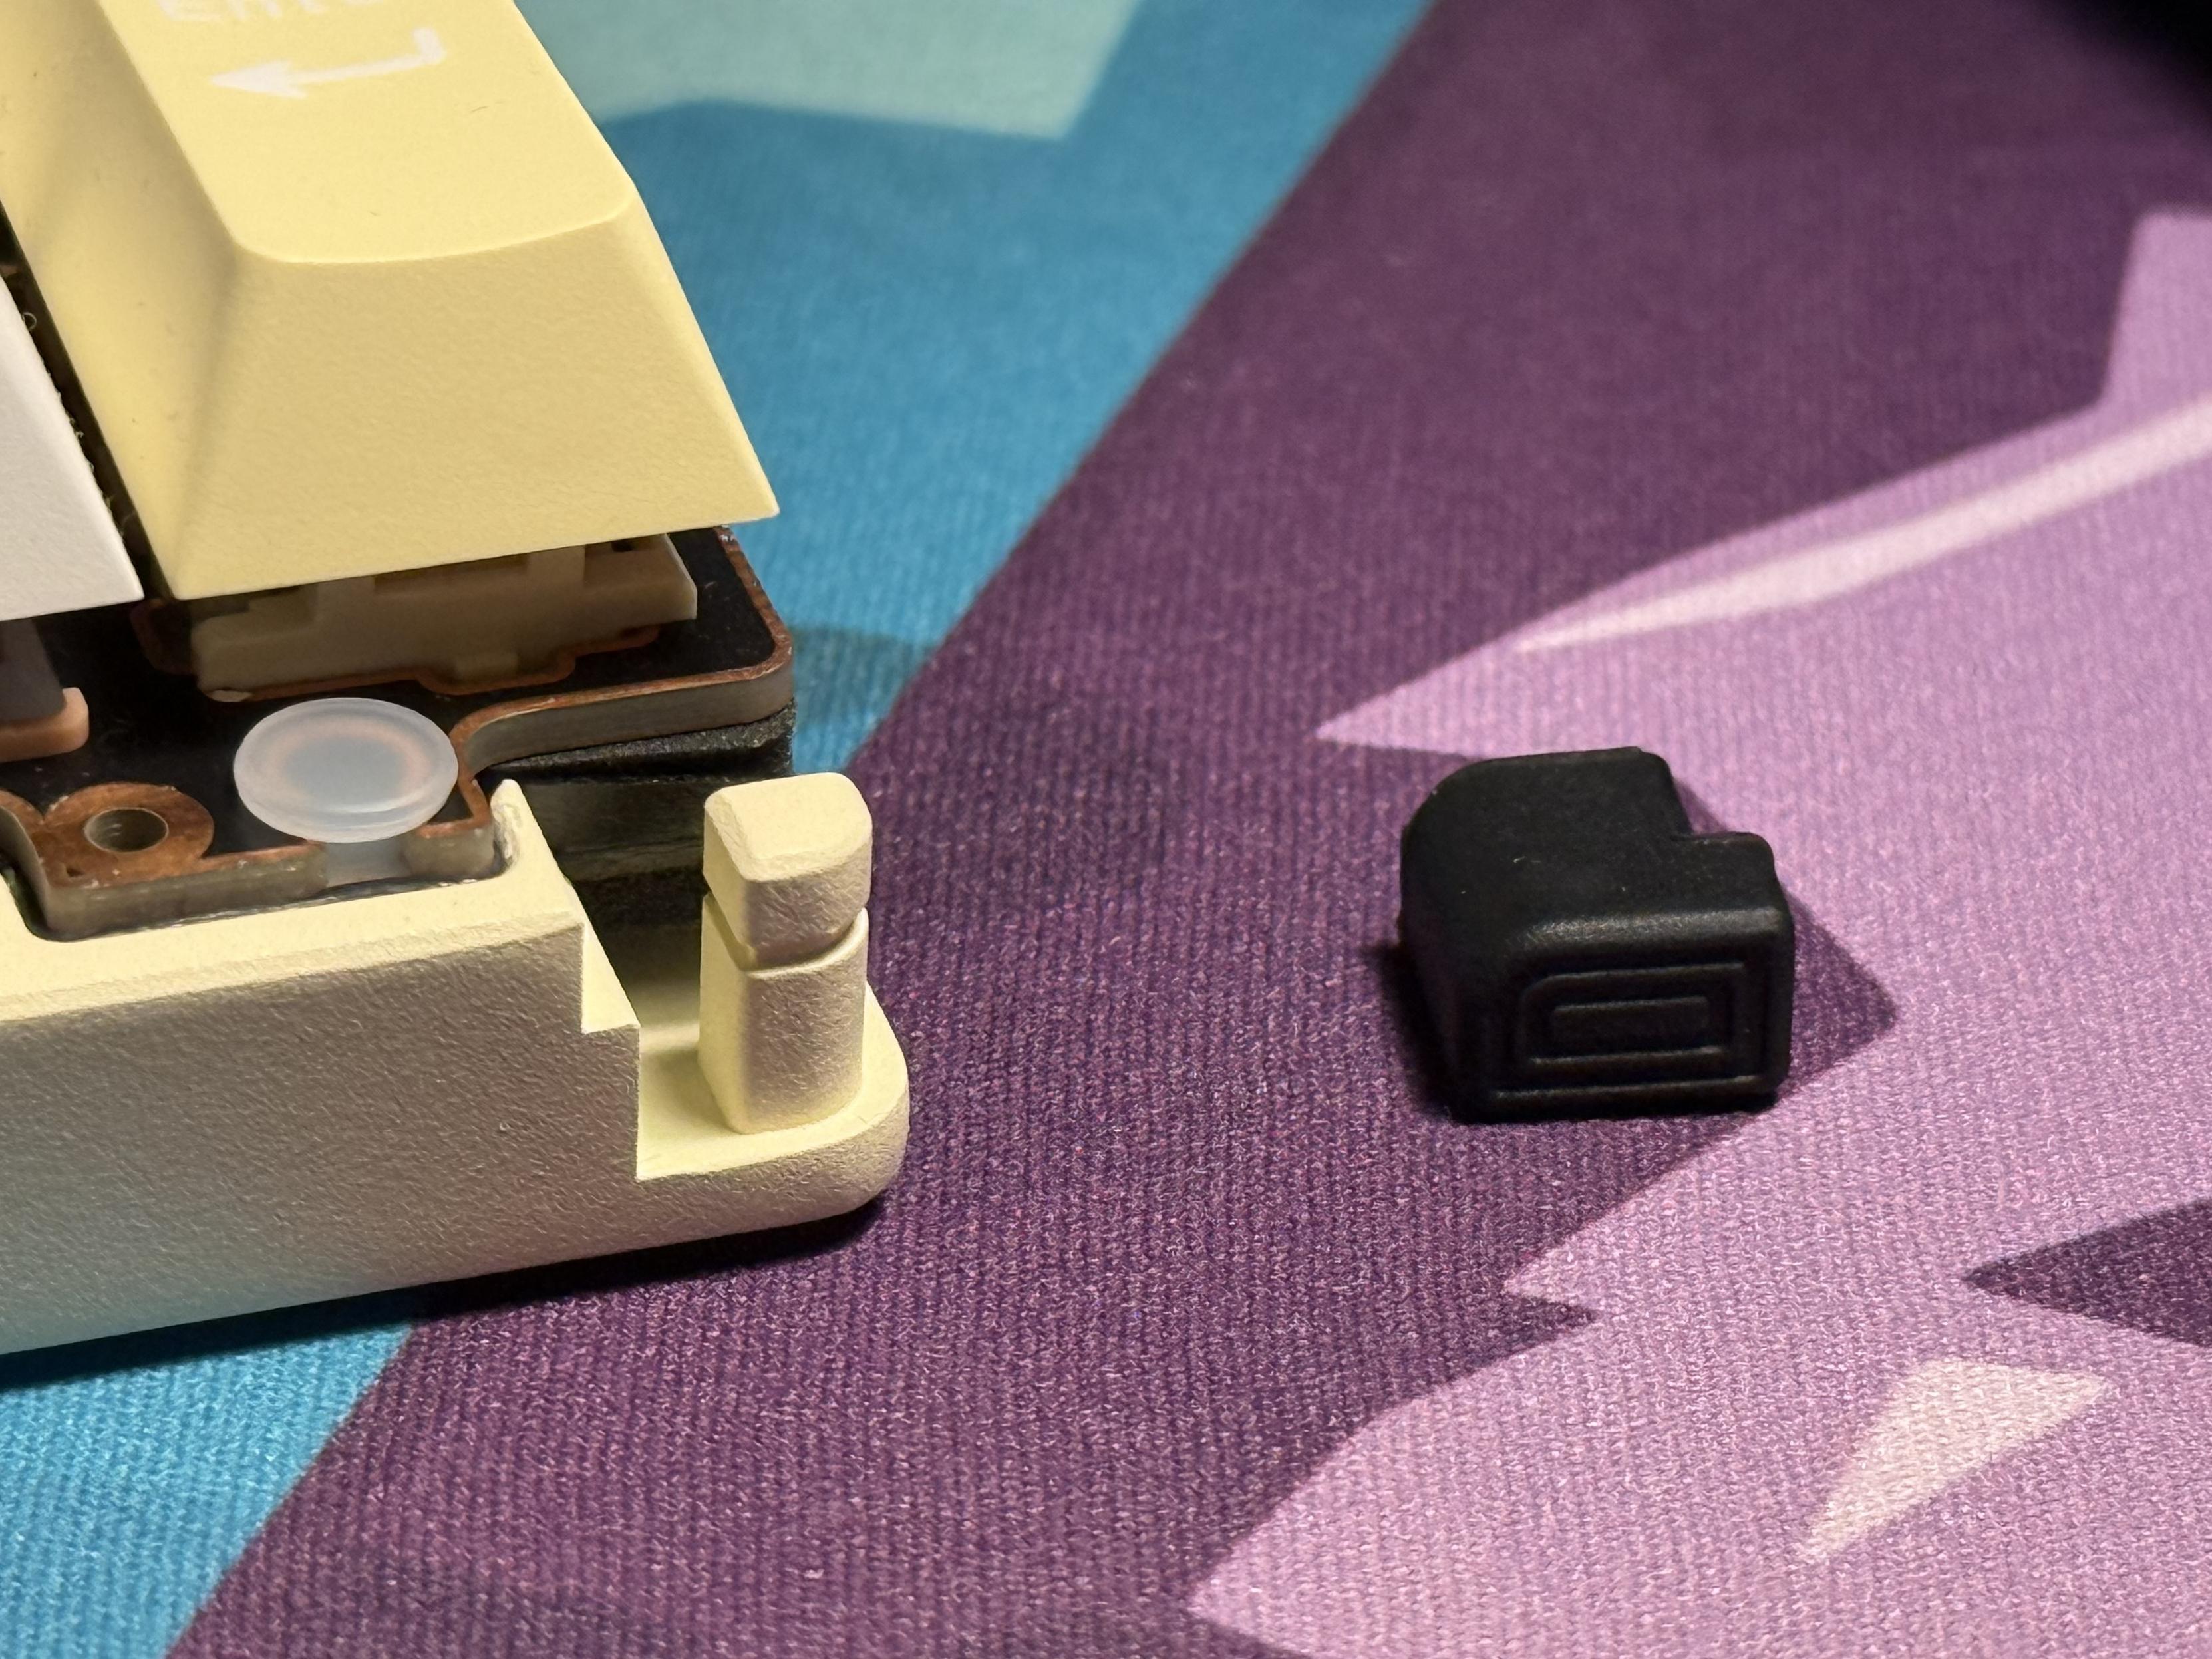
Unfortunately, as convenient as the pogo-pin arrangement might be, there’s still a little flat-flex cable connecting to a daughter board that sits underneath the PCB. The LCD’s pogo pins go right through the PCB/plate assembly and contact this board. This means, in practical terms, that when you lift up the main PCB it doesn’t snag any cables, but does pull the little daughter board out of its nook and mess up the alignment. Putting the PCB back into place, then, requires careful placement and some tedious finagling to get the daughter board into the right place. I found the best approach was to plonk the PCB/plate down then gently lift up the front edge enough to slip a finger under and poke things into their right place.
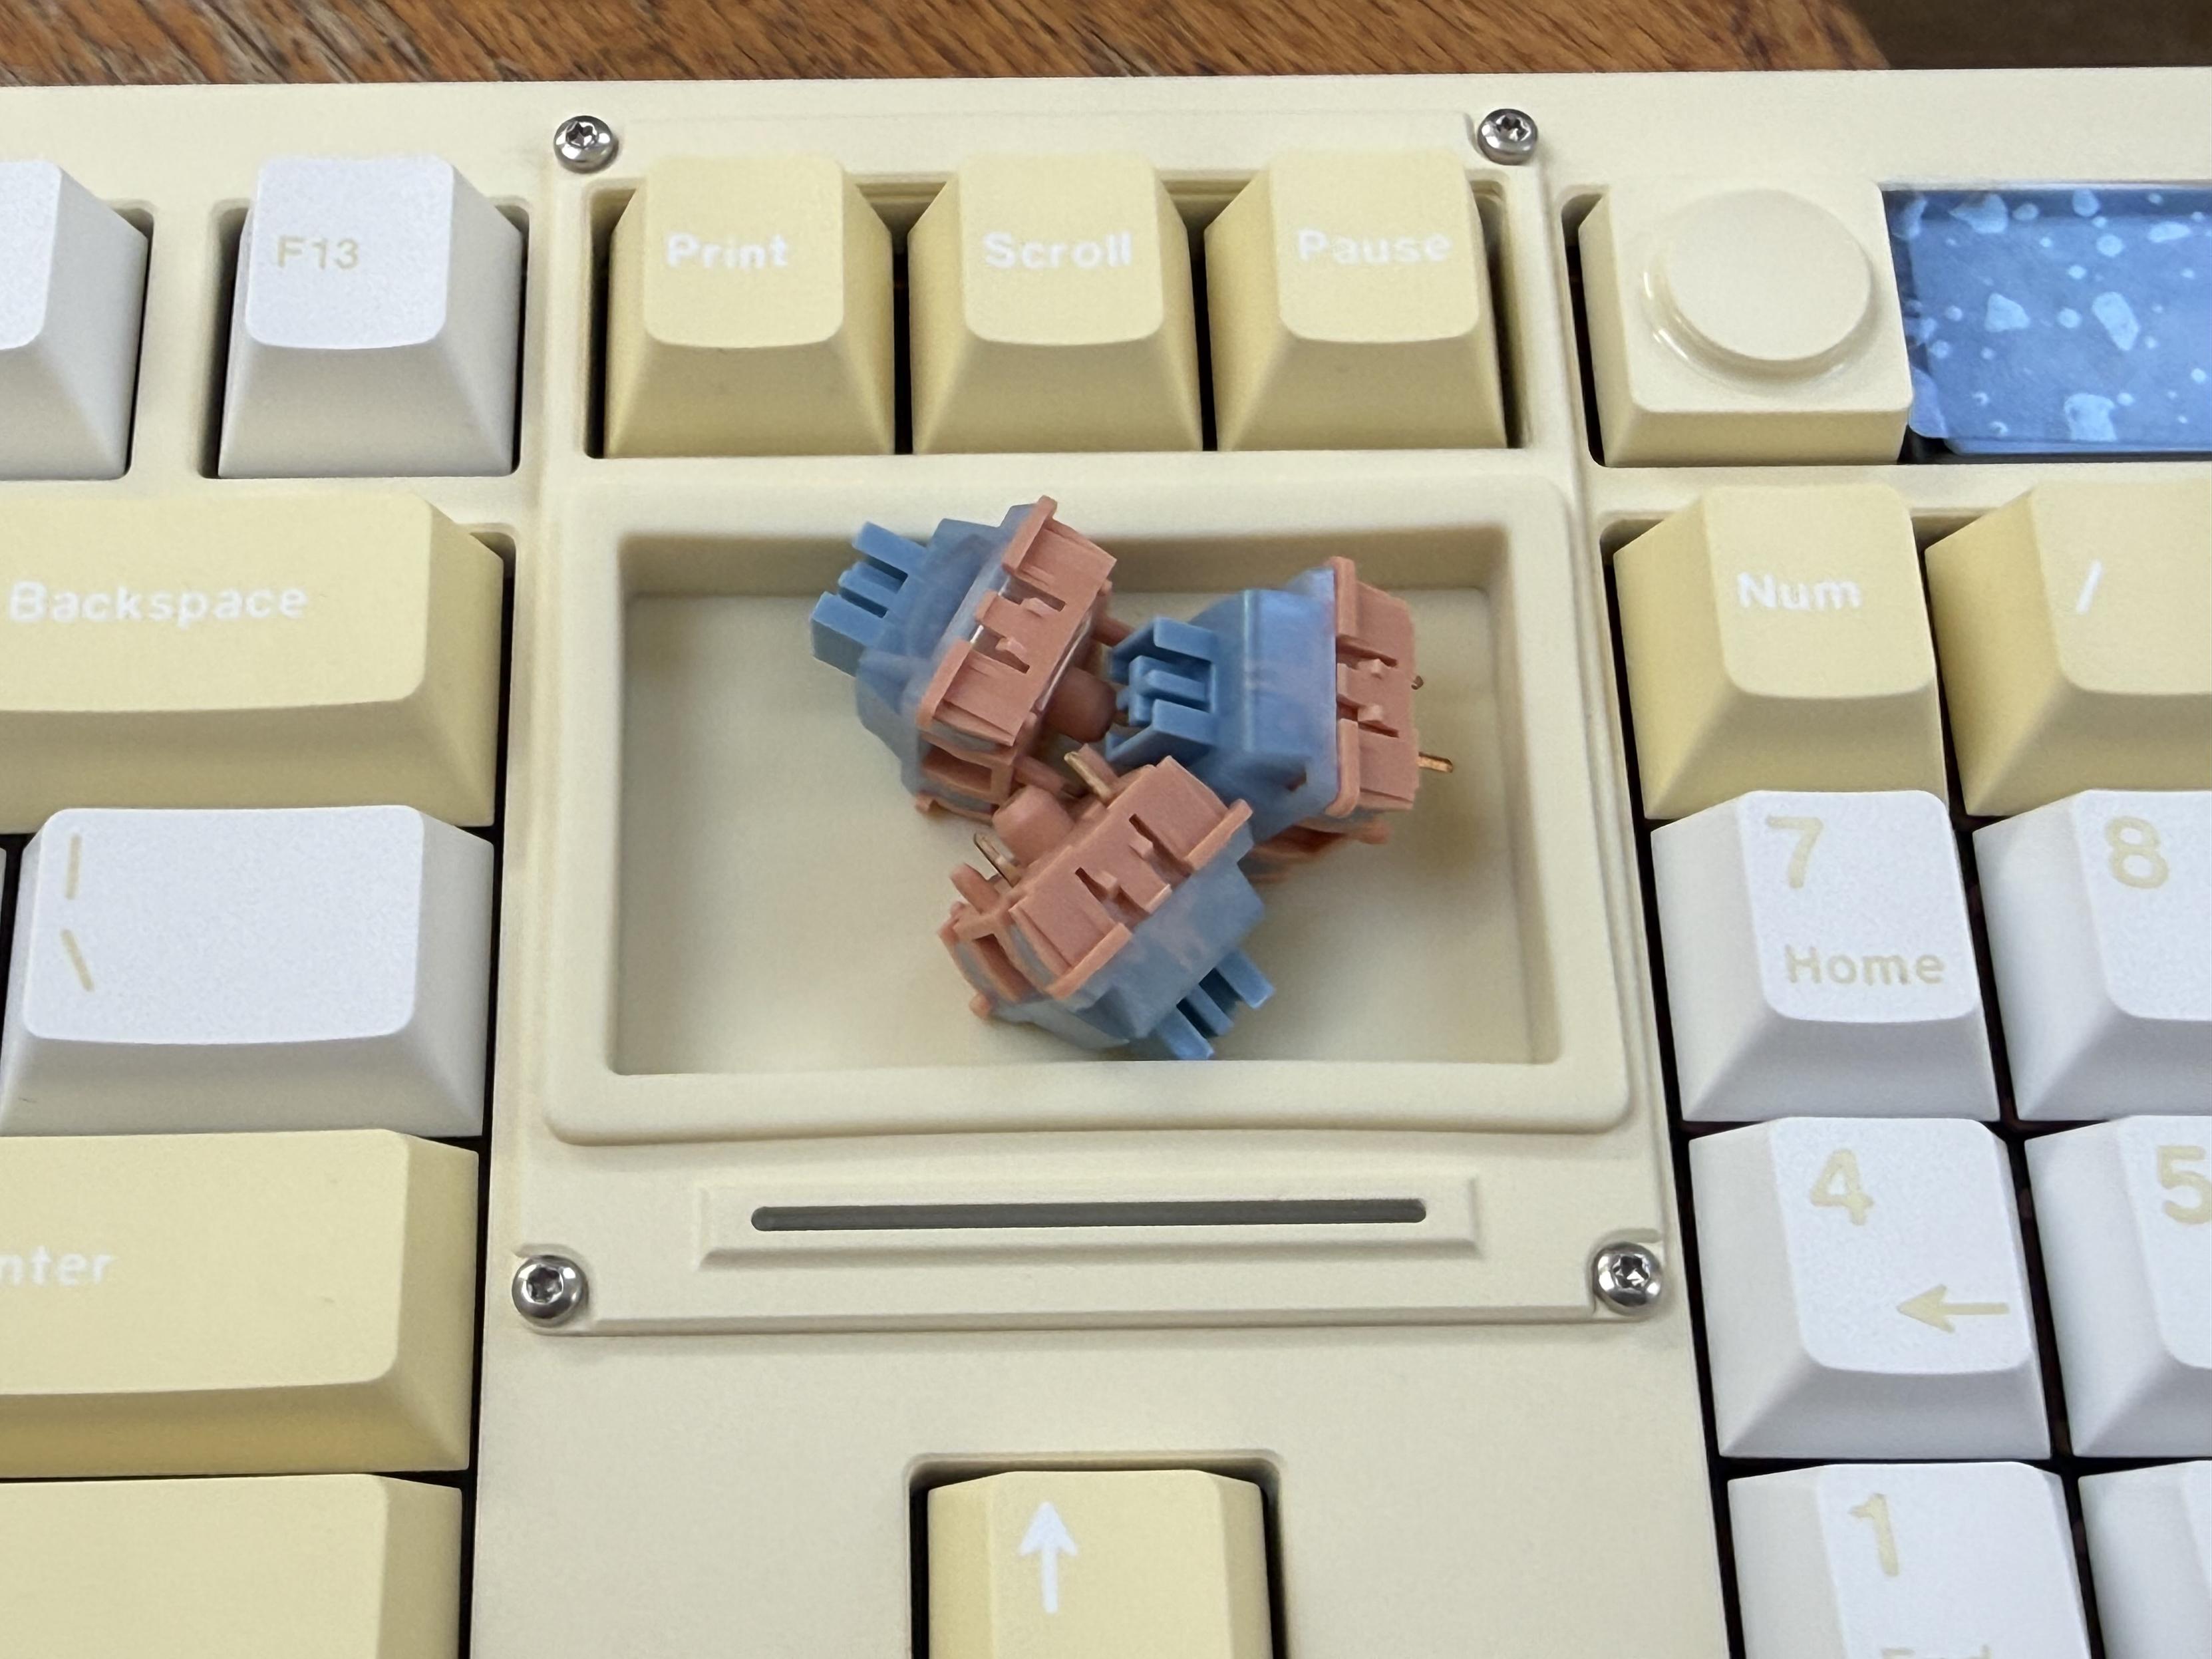
The and knob conceal three extra hotswap switch placements.
With the top off, it becomes clear that the odd, low-profile “Calculator” button is backed by a regular keyboard switch. Lifting this up and unceremoniously stuffing it into one of the free slots normally obscured by the LCD results in a working volume down button. Indeed it looks like the knob functions map directly to these three keys, which makes swapping from one to the other- in theory- simple. The knob itself is a cute little push-fit, sprung contact design which connects to some upward facing copper contacts on the PCB. Pulling it out (a switch puller works) reveals a regular mechanical switch landing underneath. You won’t get either switches or keycaps in the box to replace these, but I had plenty of spare switches and some KAM Playground macro pad keycaps that I needed to find a use for.
To complete the swap to keycaps both the LCD and the decorative shroud for the knob must be removed from the top shell. These are fixed in with Torx screws and a driver is not supplied. Thankfully the one Wiha T6 screwdriver I have for some reason fits. With the LCD and its front glass (at least I think it’s glass, it’s hefty!) and shroud removed the top of the board can clip back in and boom, three extra keys! At time of writing, however, the Chilkey ND104 software refuses to work if the LCD is not connected- it shows up as a separate USB device that the software wants you to connect.
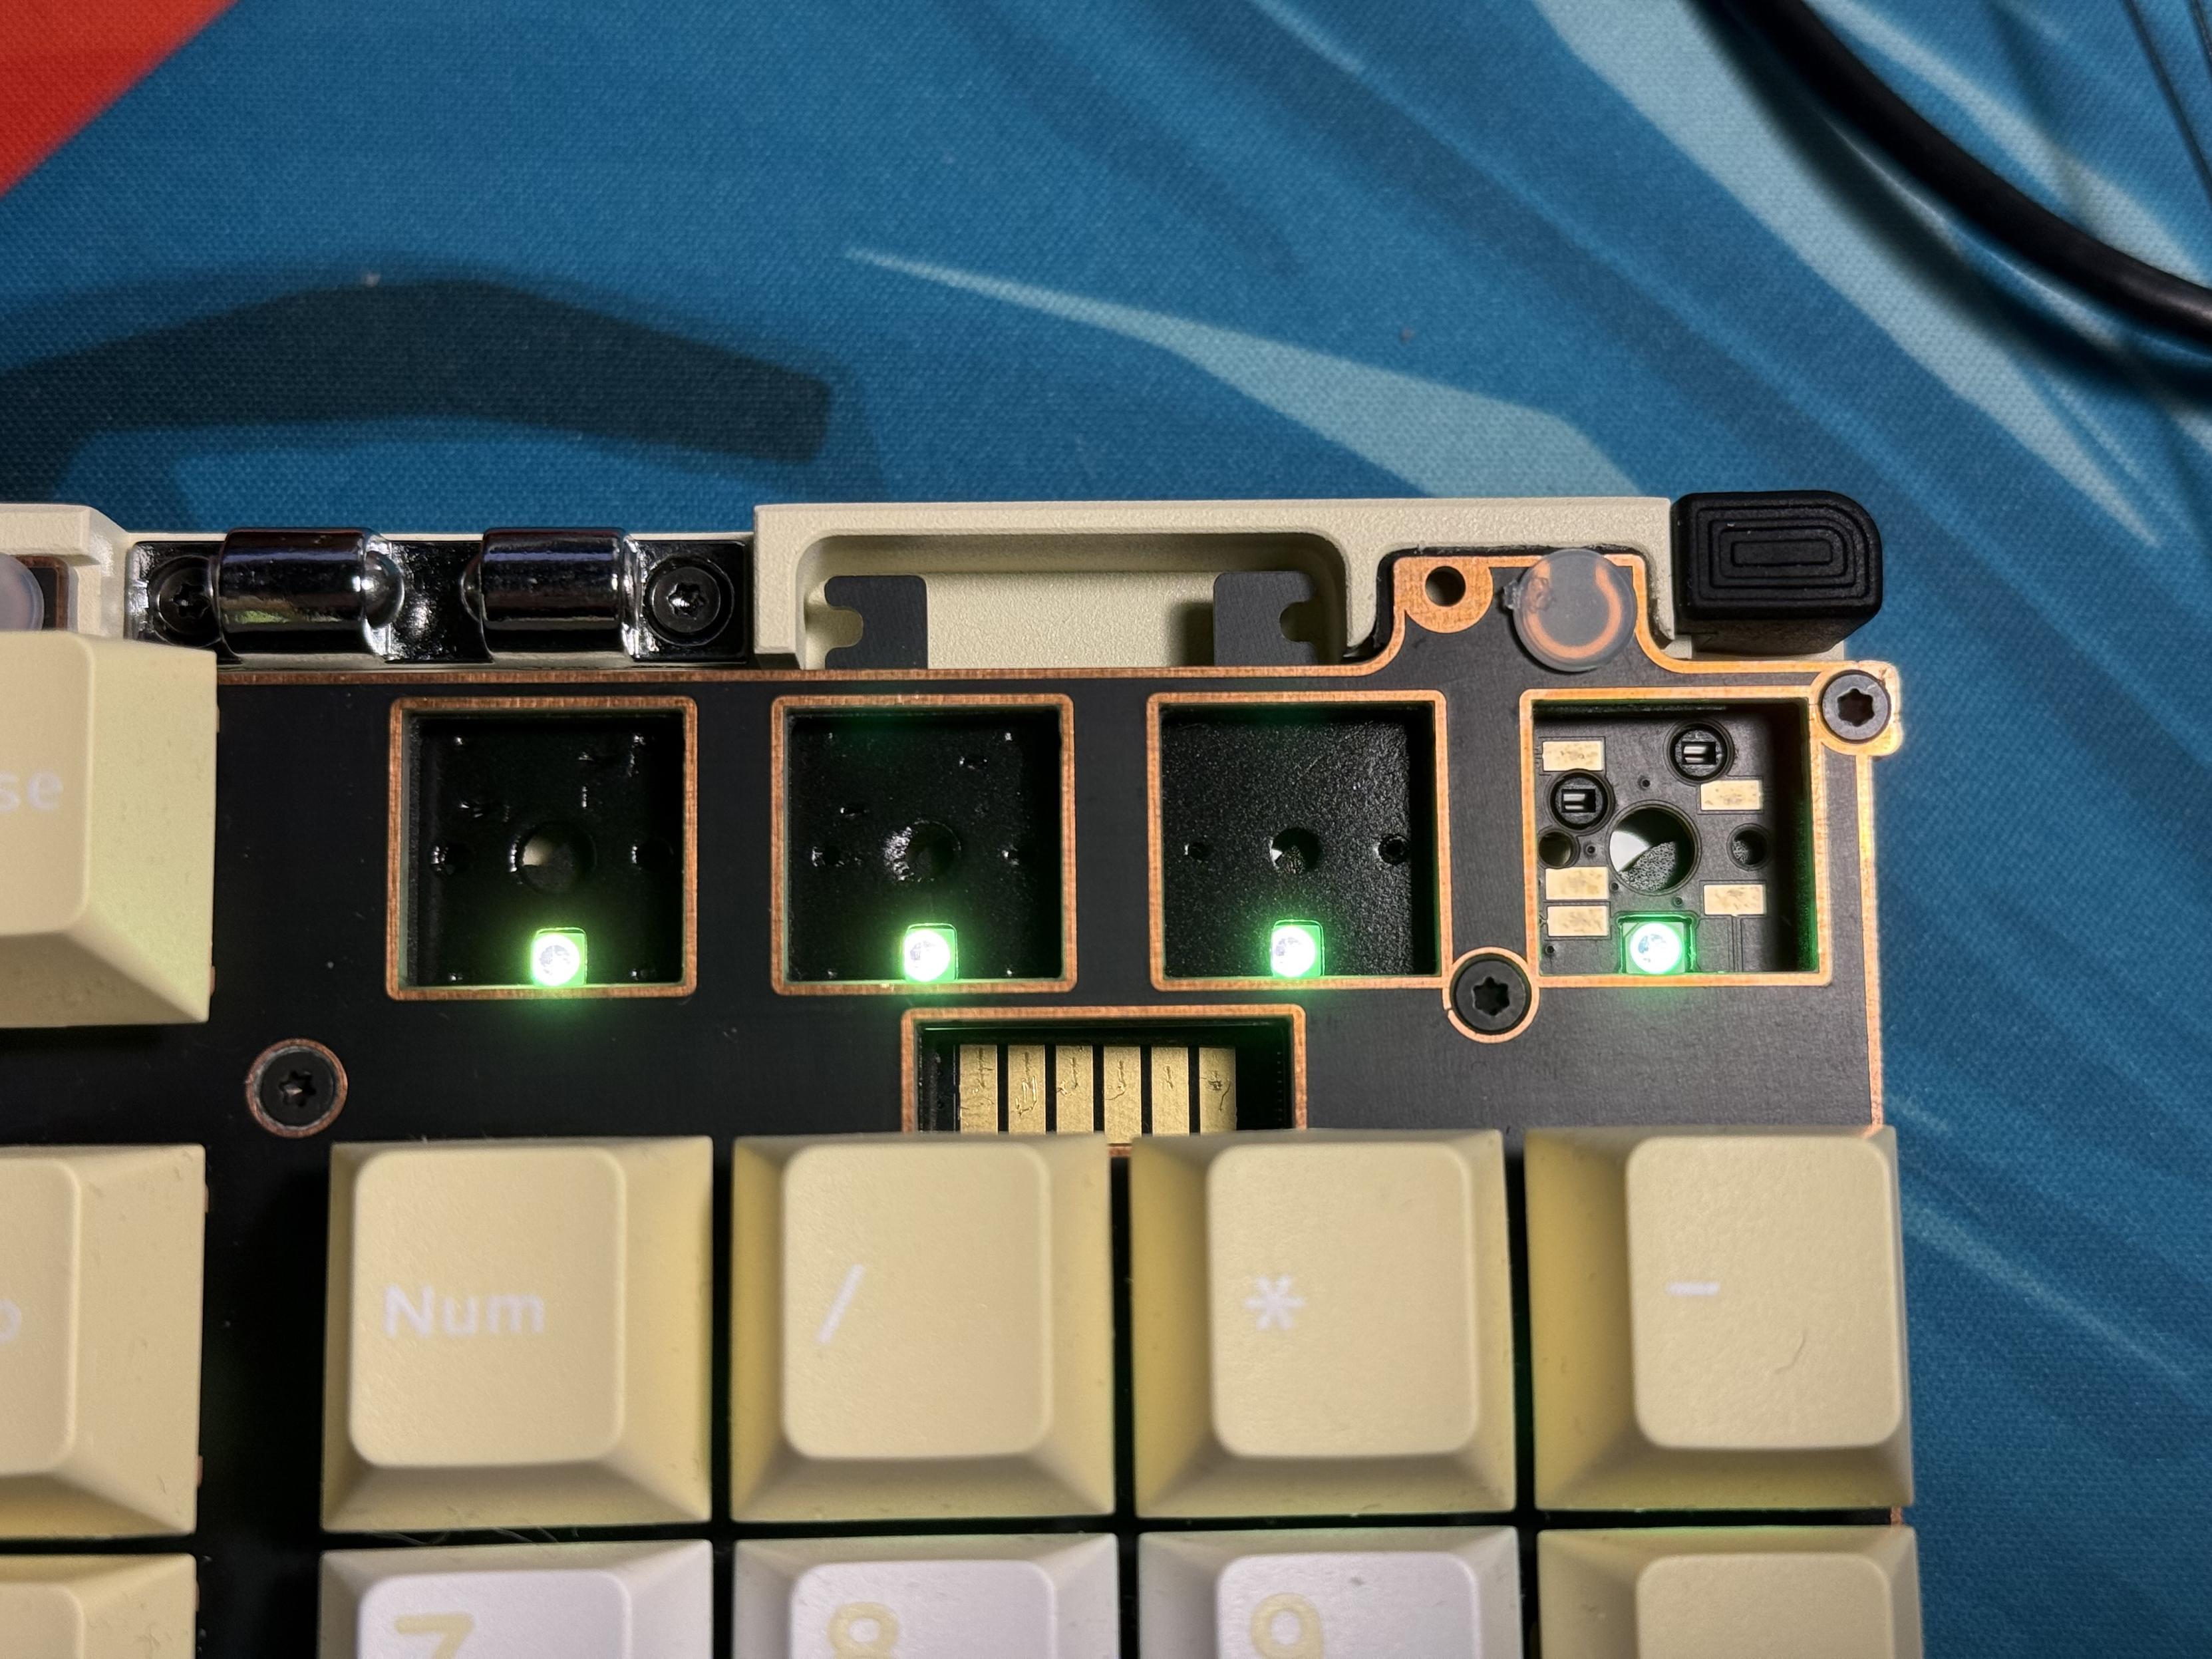
Moving swiftly on, the ND104’s plate is matte black with a copper reveal around the screws, switches and various other cutouts. Through it can be seen the five upward-facing LEDs responsible for illuminating the top lightbar between the main navigation cluster and arrow keys.
The PCB/plate assembly is isolated, by default, with twelve silicone gel mounts, which I tend to refer to as grommets. They’re a dumbbell shaped silicone grommet that pops into a little groove in the plate and provides just a little bit of mechanical isolation between the PCB/plate assembly and the casing. The fit is incredibly tight, and might not play well with mounting setups that have any slop- the plate looks like it could accommodate large plumbing o-rings for a bouncy setup. In lieu of o-rings, however, a little bag of springy silicone gaskets is supplied, these slip over protrusions on the PCB, which are sunk a little further into the bottom shell of the enclosure, and act as tiny silicone springs. Again the fit is very tight, and it’s probably not worth switching. Finally there are holes in the top shell for the top-mount option, a little bag of – you guessed it – Torx T6 screws is supplied for this.

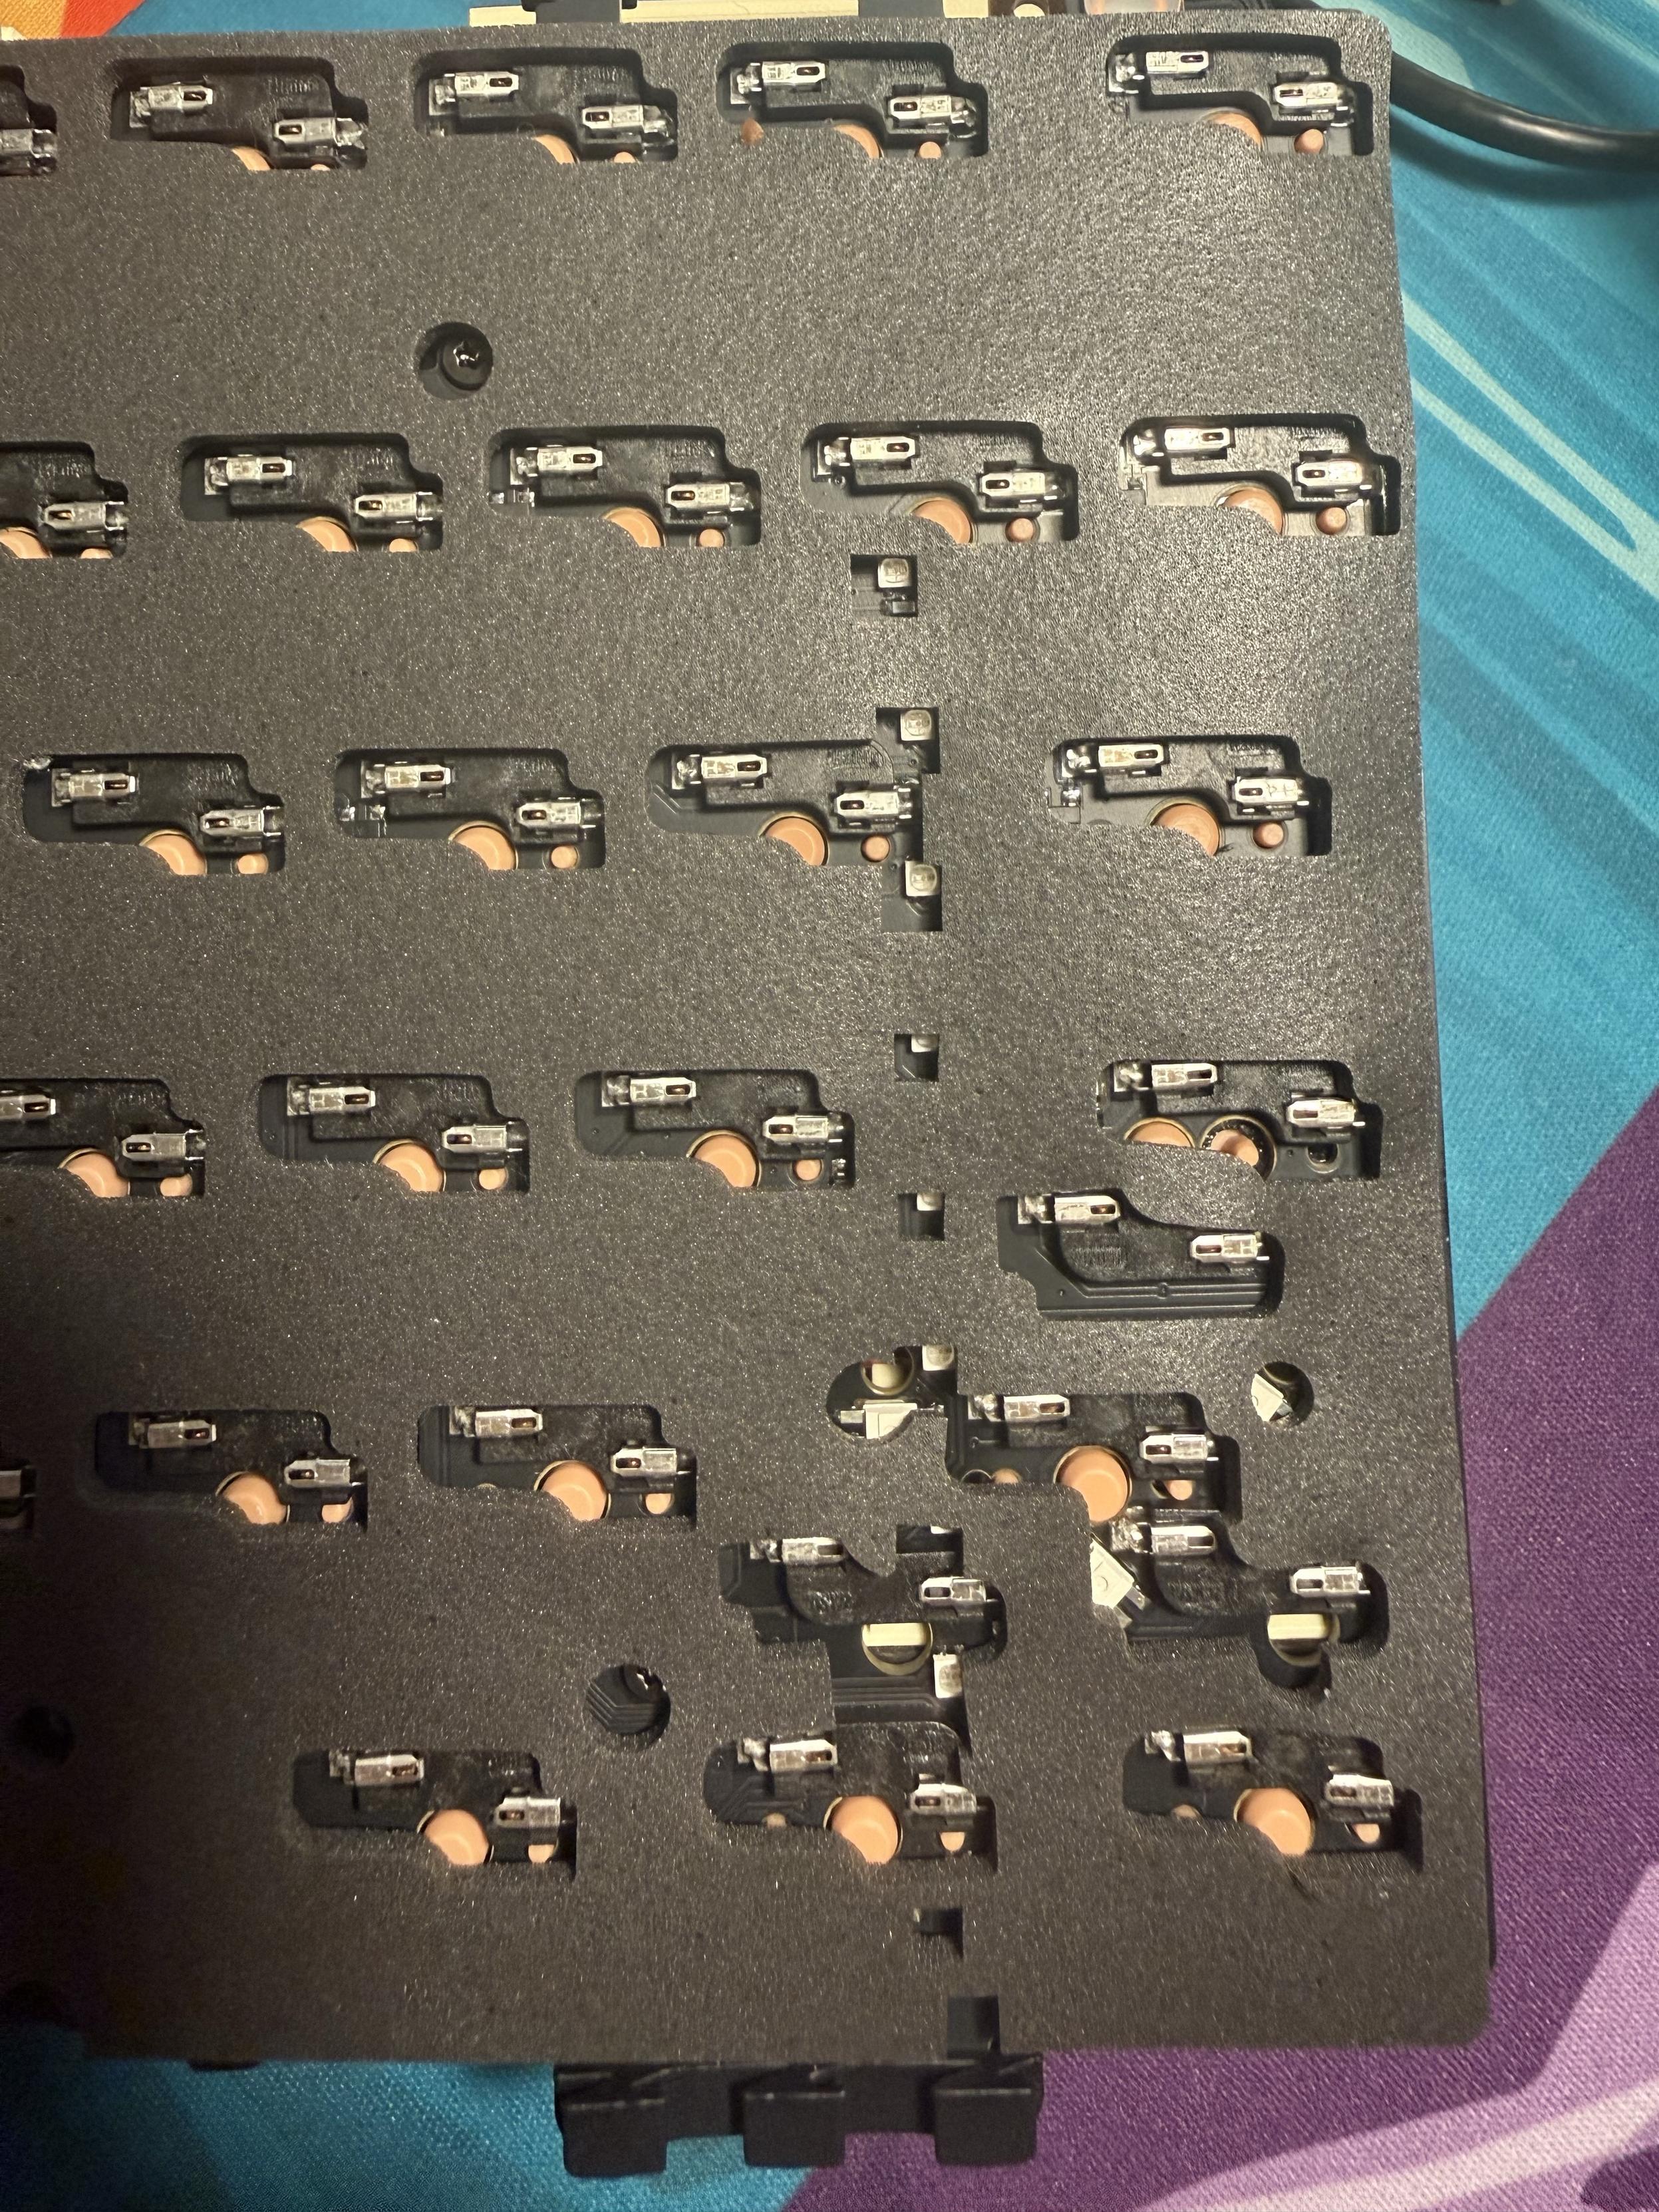
The underside of the PCB is an absolute chaos, with hotswap switches nestled together for optional ISO, split left and right shift, split spacebar, split backspace and stepped caps lock. Most of these options are not supported by the standard plate.
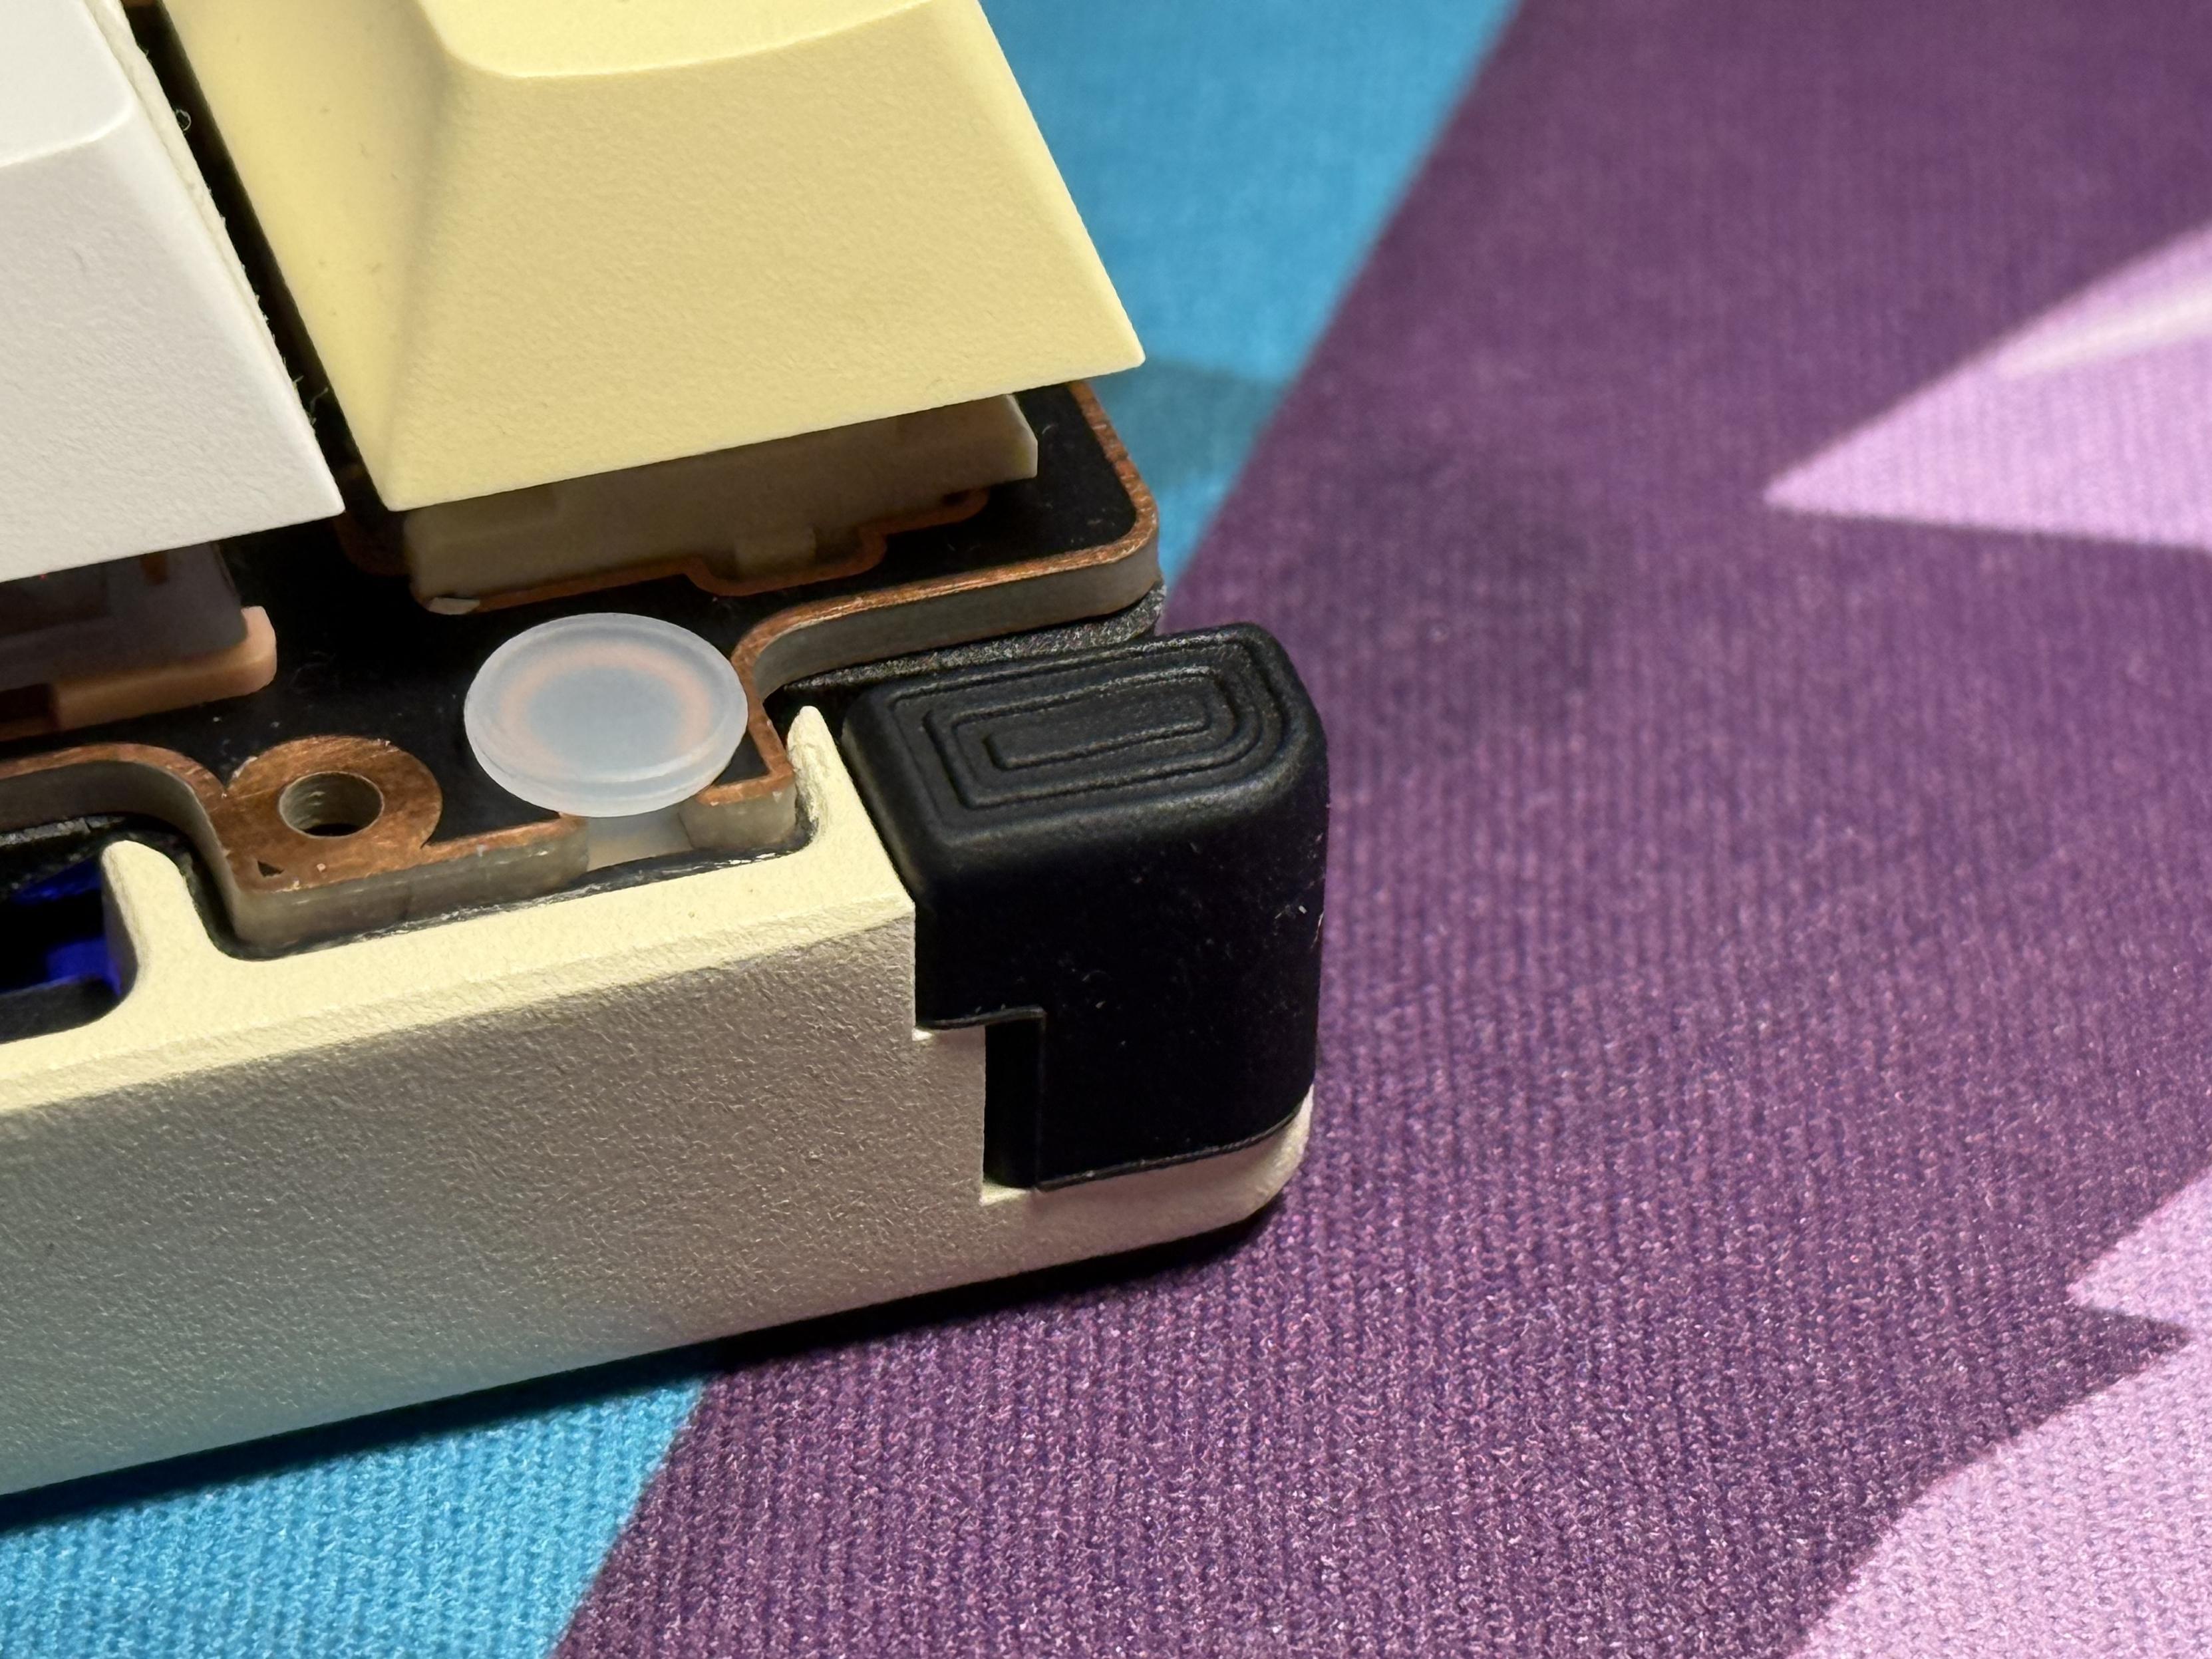
Looking under the PCB reveals a complicated cluster of hotswap sockets suggesting support for ISO enter, split left shift, split right shift, split backspace, and split spacebar. A whole bunch of toggles in the software appear to confirm this, but the plate – as supplied for the ANSI version – does not support any of these options, though it does perplexingly support a stepped capslock. A set of cut files to explore these options would be greatly appreciated! Since the PCB supports so many layout options, the stabalisers clip into the plate by default. There are holes for screw-in stabalisers if you’re brave, but there are a lot of delicate components to work around. Under the PCB is the standard layout of please-don’t-short-anything-out film, and beneath that a tidy aluminium plate covering the battery compartment and secured with five counter-sunk (nice touch) Torx (T6) screws. On the left and right are also slot in light-pipes for the underlighting, which are also secured with yet more Torx T6.
Underneath the battery cover are two 4000mAh LiPo packs, wedged in with a little triangle of foam tape. There’s no adhesive here, and the batteries are regular two-wire ones, so they should be easy to replace.
These absolute units of corner gaskets are a huge improvement over the small ones in the ND75 and Slice75.
Moving back to the bottom shell, the outer indents for the PCB and plate are lined with foam tape, presumably because they are tight and this keeps them from scraping on the aluminium enclosure. There are also rubber gaskets on the corners of the bottom shell and four rubber damping pads toward the center. The corner gaskets are much, much better than those on the Slice75, comprising a rubber sock that fits over a 1cm tall metal post, complete with a detent so they pop securely into place. They are not going to fall off and get lost, ever.
Software
The ND104 and screen are both driven by Chilkey’s web software and, thankfully, this works in both Windows and macOS. No fun for me and my efforts to write janky custom keyboard tools in Python, but a boon to – y’know – all macOS users.
Both the keyboard backlighting and bottom lighting can be controlled in the software with a surprising range of effect options from the bottom light, though many of these are variations of a smaller set of effects – there are ten variants of “Gradient” and six each of “Rainbow Swirl” and “Twinkle” for example. The bottom light controls also affect the light bar below the navigation cluster, so you’ll want to pick something subdued and not flashy and distracting.
If you’re more a VIA kinda macro tinkerer, the ND104 also supports the usual dance of downloading and sideloading a .json file (available at the bottom of this page: https://chilkey.com/pages/console) into usevia.app. Here all the familiar features are available with a whopping six layers to map across. The first thing I did was map LCD_CALC to the button on the left of the LCD, since this is normally a Fn shifted (layer 1 by default) shortcut.
To map the encoder I needed to delve into the Layout section in VIA and then I could select the Encoder on various layers and remap the push, clockwise and counterclockwise bindings. By default these are mapped as CUSTOM(16), CUSTOM(15), CUSTOM(14), which you can find by mousing over LCD Mode -, LCD Mode + and LCD TOGG in the “Custom” tab of the Keymap section. Again just mapping these straight to the knob for super quick and easy access to the LCD functions made sense, and I chose to avoid mapping Volume since I almost never use it (my open laptop has volume controls if I really need them.) Oh and while we’re on the topic of the LCD, but default it shows the key being pressed which is super, super distracting – Fn + Shift + Del turns this off. Fn + Shift + PgUp/PgDn also control the LCD brightness, though these mappings don’t seem to make sense in VIA or Chilkey’s own web driver (they appear as LCD Mode + and -). Re-binding these to an arbitrary letter shows they are mappable, but for some reason “LCD Mode +” and “LCD Mode -” behave differently depending on where they are mapped. Weird!
It’s a complex board with a lot of key binds out of the box and some – at times – confusing behaviour. For instance, my Fn key was slowly pulsing green while I was experimenting with other features and it took me far, far too long to realise it was the charging indicator. Thankfully it can be turned off with Fn + M. If, like me, you’re infamously bad at reading instructions then you should keep the manual on your desk for reference until you get comfortable with the board. Other advanced features include a toggle to limit the backlight brightness to 50% on battery ( Fn + Right Shift + H ). I found the backlight max brightness to be a little low generally, but thankfully it does have 16 levels of brightness and around 32 different hues selectable in static mode using Fn + P.
For macOS users, the Win and Alt keys can be swapped by holding Fn + W for three seconds. There’s no visual confirmation of this and it’s not easy to gauge three seconds accurately, so you should count one-one-hundred-two-one-hundred-three-one-hundred slowly to make sure the change takes effect. Switching back to Windows layout can be done with Fn + Q (seasoned tri-mode keyboard users would expect these to be Bluetooth modes, but not here). If you plan on creating your own custom layout, you should probably avoid these toggles since it’ll get confusing fast.
You’ll also find the entire F row is missing Fn-shifted commands- so screen brightness, Mission Control, Search, transport controls and volume binds you might be familiar with as an Apple user will have to be manually added in VIA. At time of writing Chilkey’s CUSTOM(0) “Mission Control” and CUSTOM(1) “Launch Pad” do not work, but you can use an Any key (at the bottom of Special in VIA) and use 0xc1 and 0xc2 for these respectively. I was unable to add Dictation or Do Not Disturb bindings, and I believe these require firmware support.
The Calculator
One of the hallmark features of the ND104 is the ability to quickly swap the Numpad and LCD over to function as a standalone calculator. True to my devious nature I immediately found a way to crash this, but Chilkey had a fix and a new firmware over to me in a matter of days. By default the calculator button is the one round-capped button to the left of the LCD and you must press Fn + this button to switch to calculator mode. Probably the first tweak you’ll make, like me, is to remap this to just a simple button press.
Tapping the Calculator button immediately switches the LCD from showing the Date/Time (assuming you set it with Chilkey’s own web software) to showing a basic calculator view. This shows a helpful contextual view of the current operation you’re performing and if (unlike me) you’re a numpad wizard you’ll find calculations super quick and intuitive. The calculator app is very nicely presented overall, but you are limited to calculations that physically fit on the screen… which is a bit silly. One sensible workaround for this is to do a simple sum (for the sake of argument, let’s say we’re adding a bunch of numbers) and then hit Enter to produce the result, then you can forge right ahead and hit + again to add another number. The result of your previous calculation will automatically be promoted to the input for the next sum, handy! It’s not the most perfect calculator, but it’s handy in a pinch.
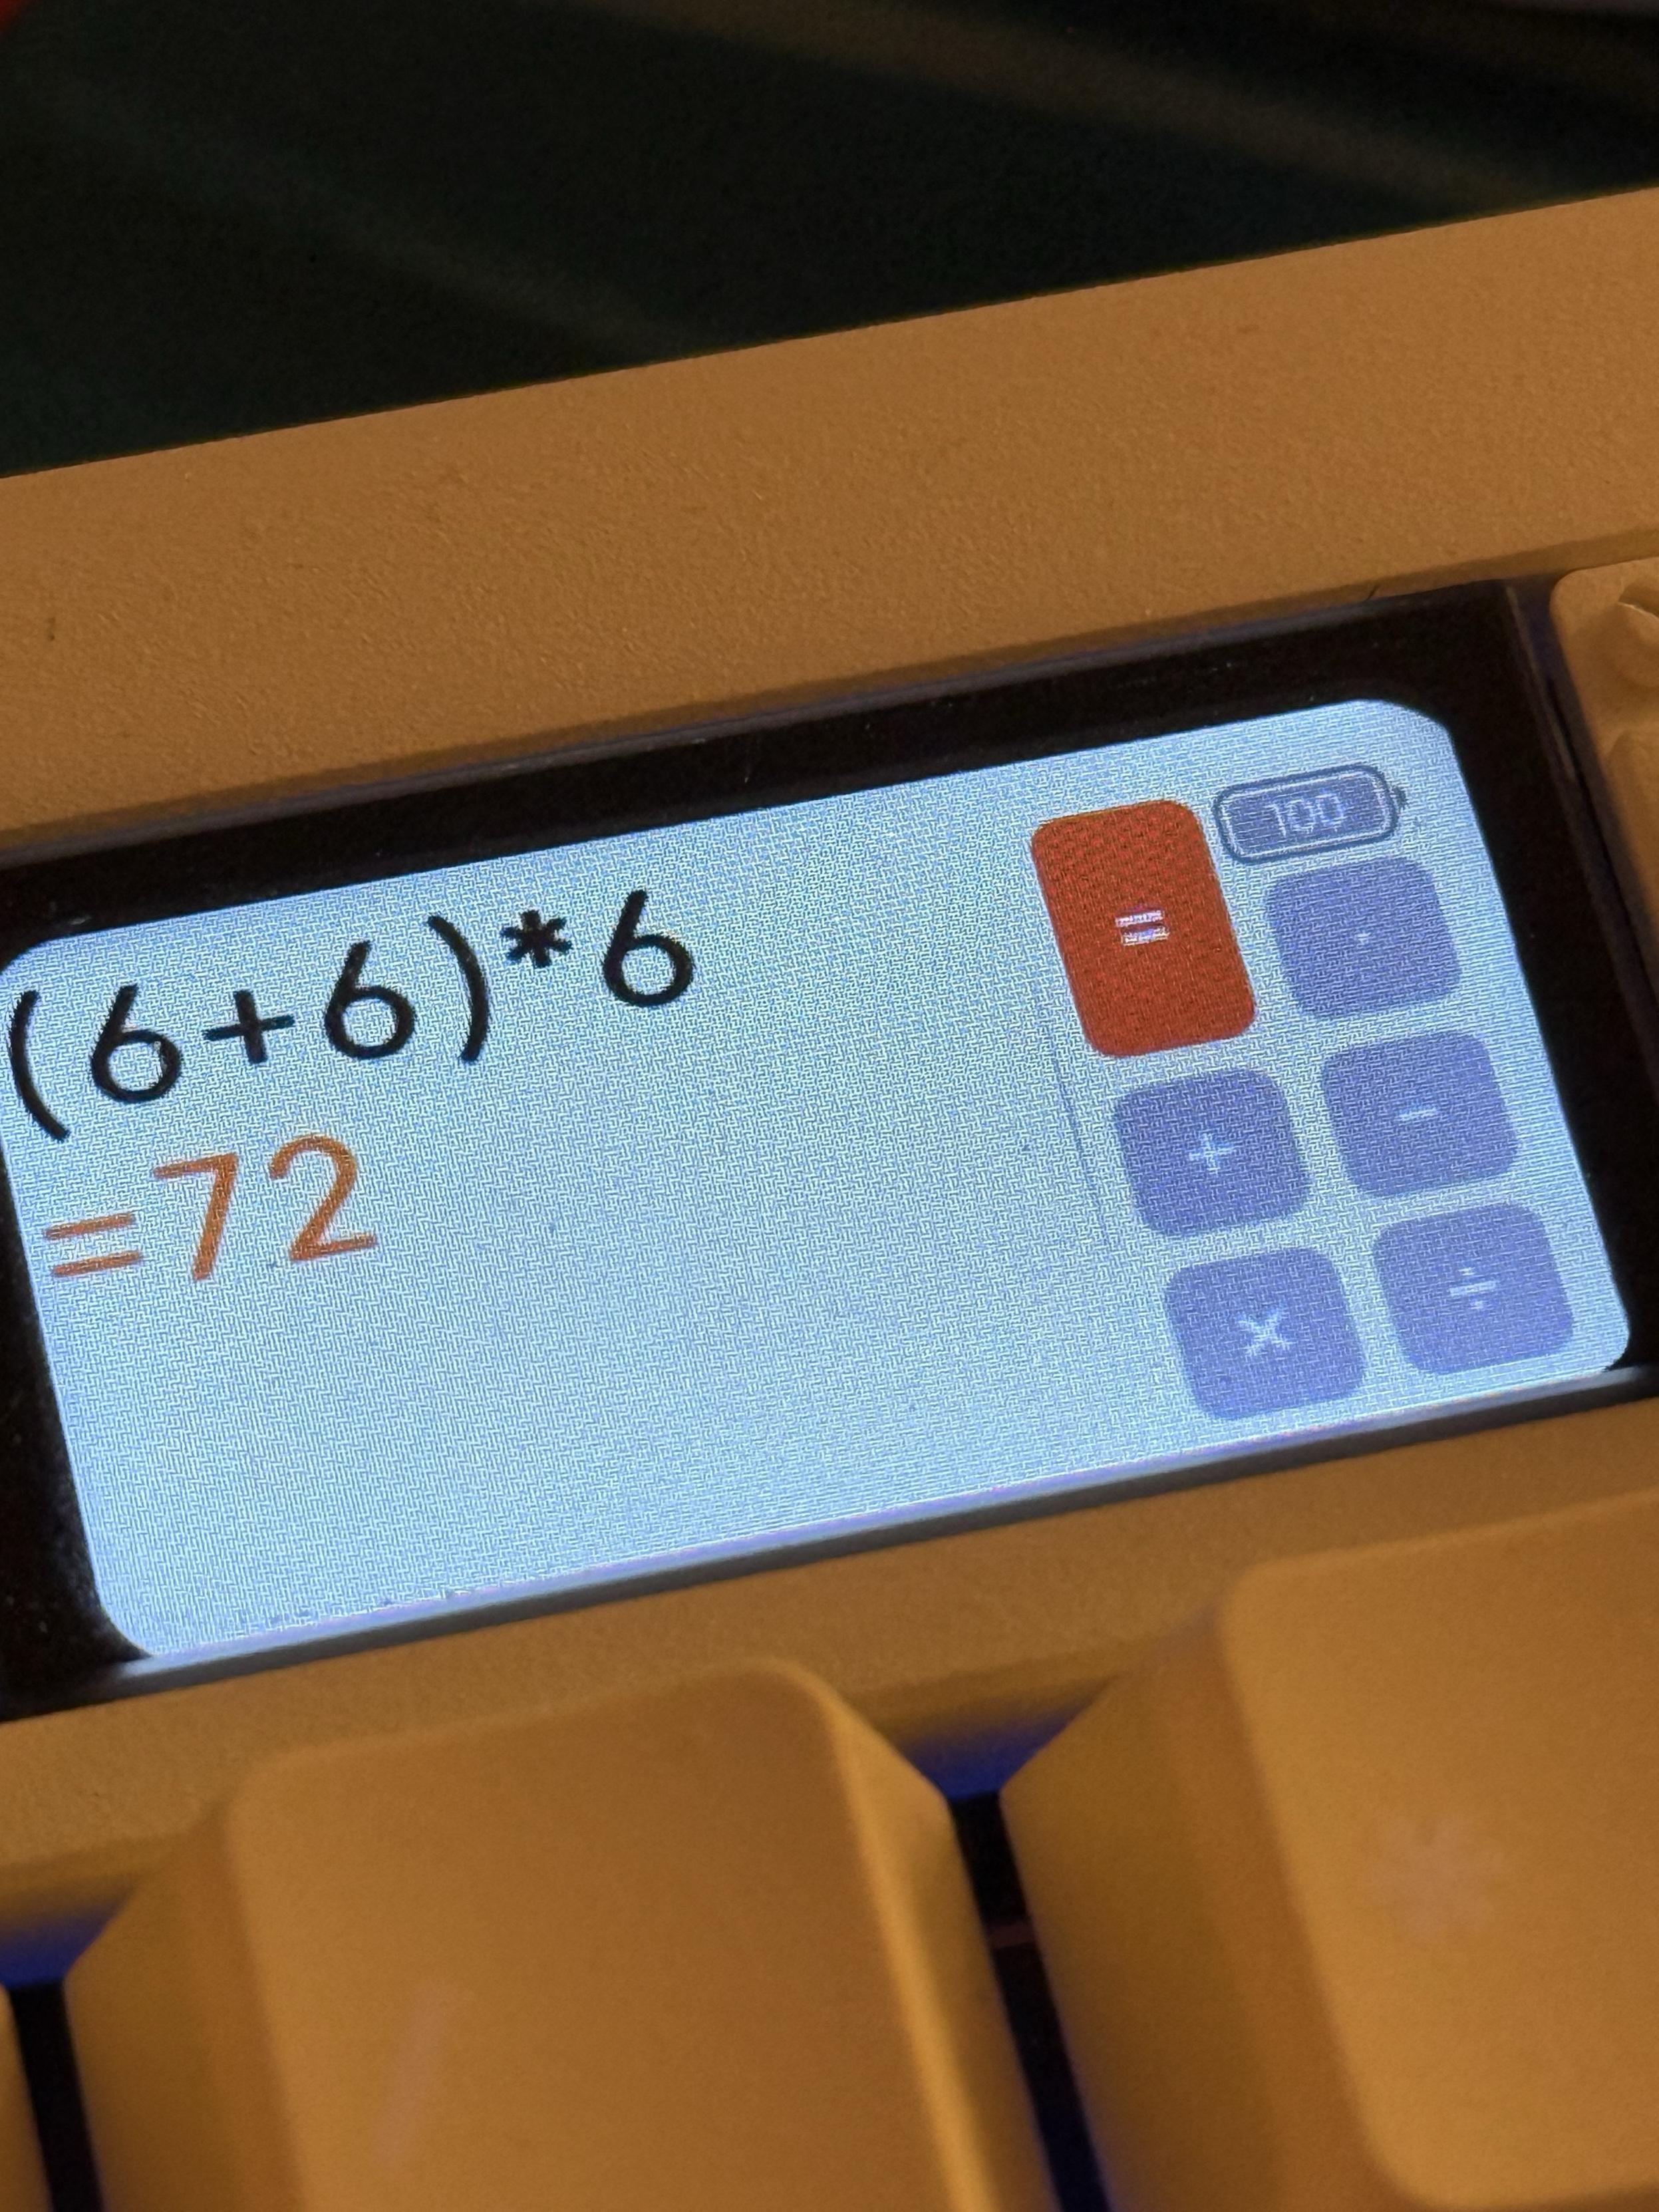
All credit to the calculator which can - I found by accident - even correctly resolve bracketed calculations which override operator precedence.
Entirely by accident (I didn’t really read the manual) I found out that both ( and ) (left and right parenthesis) are also usable in the calculator app, though you must long press them for them to input. A calculation of (6 + 6) * 6 correctly produces a result of 72, vs 6 + 6 * 6 (which due to operator precedence is 6 + (6 * 6)) correctly produces 42.
It would be nice if calculations like 2 ** 8 (a Pythonic two, to the power of 8) worked, or there were some shortcut for square root, sin, cos and other scientific functions (the sort of things I tend to use periodically) but for basic running totals and simple everyday sums it’s handy.
One thing to note for macOS users is that the Num Lock key – used as backspace in calculator mode – does not behave as a Num Lock key. That’s to say there is zero indication it does anything, no LED changes, no change of functionality of the NumPad. In Windows this behaves like Num Lock as normal, but there’s no led indication or indication on the LCD that Num Lock is engaged. This means that it doesn’t mess with the backlight, at least. (Edit: Within a day of me reporting this to Chilkey, they’ve updated the firmware to include a NumLock icon on the LCD.)
Overall
While I wouldn’t normally pick yellow- I decided to go a little off-piste out of interest – and I wouldn’t normally use a full-sized board I can’t deny that the ND104 is a great keyboard with an almost impeccable design, great modularity, good-enough keycaps and that actually-quite-useful-and-well-thought-out calculator feature. Software is often the weakpoint for mechanical keyboards, but with VIA compatibility there’s always a fallback. The LCD features work in macOS – yay – and my only real complaint is that it defaults to showing key presses. Honestly this is a non-feature… maybe WPM would be a better thing to show, ha!
Over the course of my testing I have swapped the ND104 between other boards, and have not encountered any glaring issues with idle battery life or connectivity, though the board seems to disagree sometimes with the USB Type-C hub/dock I use with my MacBook. Battery life should be a given, really, but when testing the Zoom 65 V3 I found a severely short battery life and traced that back to the LCD idle power consumption. I’ve yet to encounter any such issues with the ND104. The LCD even appears to have its own tiny backup battery and, indeed, it keeps the time, even if I open up the board. In fact the LCD is one of the best implementations I’ve seen from Chilkey yet- it’s a separate USB device with its own separate firmware, and the calculator feature is genuinely a really practical use for it. I’m certain it would even quite happily run standalone and it’s on my long todo list to experiment with that. I’d be willing to bet the pins are power, ground, USB D+- and UART TX/RX albeit not in that specific order.
If I could change anything on ND104 it would be to remove the front faceplate and use a push-fit silicone diffuser for the light bar. You can unscrew the faceplate, but it leaves unsightly screwholes behind and your success at blocking those will depend on the colour of the board and your aptitude for arts and crafts. As for a push-fit diffuser… that’s probably quite an easy thing to whip up. Heck you could probably just fill the hole with hot glue.

I definitely prefer the ND104 without this weird faceplate thingy.
If you’re looking for a solid, aluminium, full-size that’s a little more refined than a Duckey, and has an integrated calculator to boot; look no further. It’s not perfect, but it’s a hell of a lot of keyboard for your money. There are six days left to secure yours on Kickstarter and you can find out more about ND104 on the Chilkey website.
I hope to get hold of cut files (nudge nudge, Chilkey), or alternate plates for the ND104 so that I can explore other layout options- especially ISO! But since it also supports split spacebar, left shift, right shift and backspace there’s an awful lot of room for experimentation.