Ducky One 3 Pro Nazca Line 100% Reviewed
I first tested a 100% Ducky One 3 almost exactly two years ago, and found it to be an excellent all-round board uncomplicated by . Now with its successor in hand, there’s no more fitting way to book-end two years of keyboard reviews than going back to – more or less – where I started.
I was lucky enough to get my hands on a Ducky One 3 Pro Nazca Line for this review. What’s changed in two years? Not all that much. New switches, new innards, but very much the same look, feel, fit and finish. The One 3 Pro is unmistakably a successor to the One 3, and it’s a worthy successor at that.
Very much enjoying blue switches on the Ducky One 3 Pro!
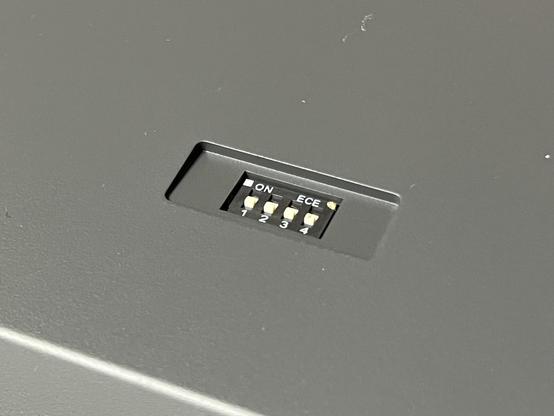
Like its predecessor the Ducky One 3 Pro Nazca Line is a wired-only, hot-swappable mechanical keyboard with a detachable USB cable. It even has the same DIP switch, a refreshingly mechanical function toggle in a world where so many keyboards rely on complex software and companion desktop apps.
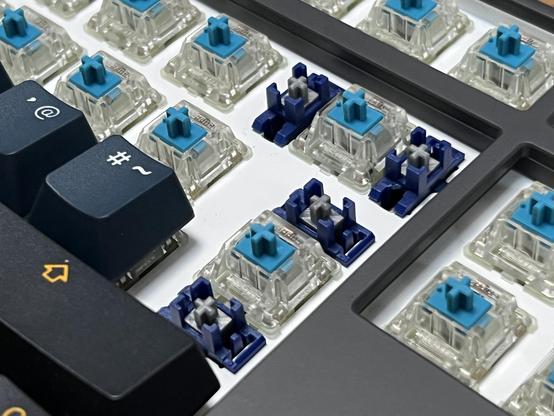
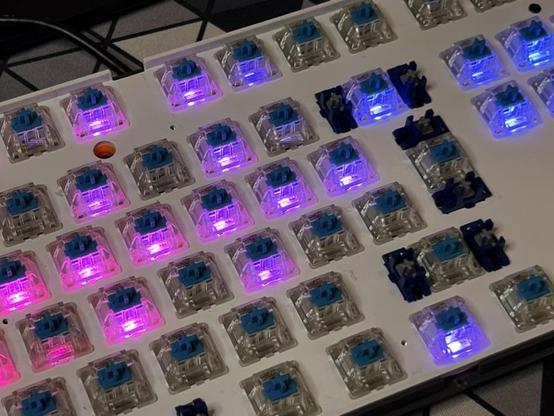
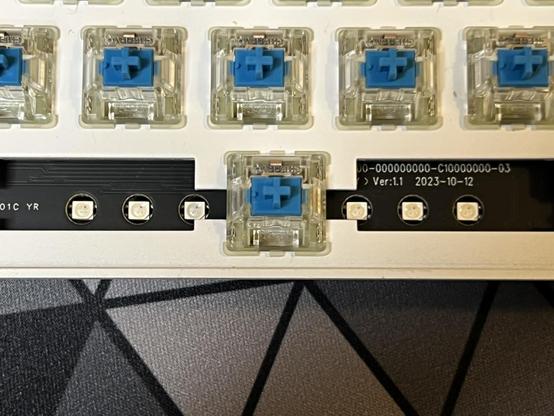
The Nazca Line is the first keyboard I’ve tested that features switches from the new MX2A range. Unusually for me, I plumbed for tactile, clicky Blue switches, and after using linear for so long (especially on the Hall-Effect boards I’ve been testing) some real feedback is very, very much welcome. I’ve yet to discern any difference between Cherry’s MX2A line and the original MX, but I’m willing to take it on faith that newer is better. There’s a little sticker on the box touting these new switches, too, so it’s clearly a selling point. Nonetheless the blue MX2A switches are a joy to type on and I’m tempted to pick some up for a custom build.
Hot swappable blue switches and matching blue/grey stabilisers, coordinated!
As far as I’m aware, these MX2A switches are backwards-compatible with old MX switches. There’s no footprint change, so if you’ve got a favourite switch that you’d rather swap in to your One 3 Pro then you’re good to go. There’s an abundance of choice out there, and a Ducky board is a good canvas for experimentation.
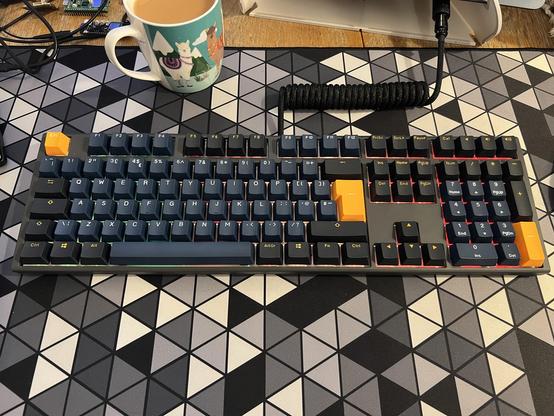
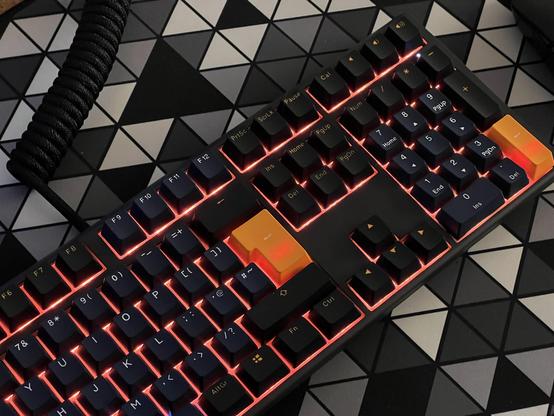
As for looks, I’m a big fan of the One 3 Pro’s new black, navy blue and orange colourway. In fact that was a big draw toward this board, much like the Matcha attracted me to its predecessor. The bold colours are backed up by decent legends, with most keys being crisp, consistent, sensibly aligned and flawless. Legends aren’t completely perfect, though, with the wordier keys – such as Pause, PgUp, PgDn – having slight inconsistencies in the letter formation and line widths. This seems to be pretty typical of entry-level doubleshot (or triple, in Ducky’s case) moulded keys and Ducky have broadly preferred icons – arrows on Backspace, Shift and Return – in lieu of text so it’s not as noticeable as it could have been, and it has the same flared left and right edges. I’m not the biggest fan of these, but they’re relatively unassuming in black and grey. The whole fit and finish gives the keyboard something of a synthesizer style look, with the Ducky logo along the back edge really selling that theme. A keyboard that looks like a keyboard, ha!
Underneath the keyboard are pretty standard flip-out plastic feet offering two additional levels of tilt over the flat-on-the-desk default. The USB port for the detachable cable is recessed into the bottom middle, and a channel running the length of the keyboard lets you route the cable either out of the left, right or middle to suit your preference.
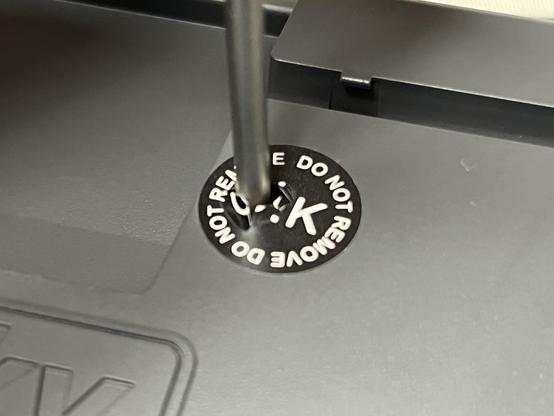
The aforementioned flared edges are clip-on covers that conceal some of the screws holding the keyboard together- the others are visible on the bottom, with a bonus screw underneath a “Do Not Remove” sticker. I didn’t remove it…
That’s a fine line I didn’t cross 🤣
Teardown
I never opened up the Ducky One 3, or even tried, since I hadn’t quite meshed my hobby electronics credentials with my tech writing at the time. The One 3 Pro has been less lucky, I unceremoniously popped a screwdriver through the threatening sticker and proceeded to work my way inside the board.
A lot of attention to detail and surprisingly easy disassembly- as long as you successfully make your way through the plastic clips holding it together.
Prying off the end caps requires a little tough love, grabbing them by the larger back edge and pulling outwards. Underneath each side are two screws, which are joined by the three in the underside of the board for a total of seven you’ll need to work your way inside.
With the screws removed the top and bottom halves are still secured with plastic clips. Since the underside screws are along the back edge I worked carefully along the front and was able to hinge the keyboard open.
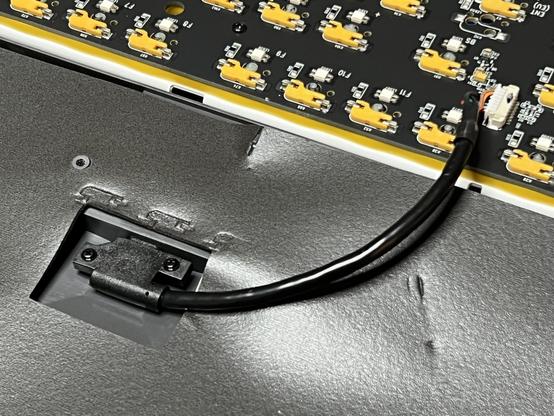
A solid JST connector leading to a little moulded, reinforced standalone USB C connector. No daughter PCB, an interesting choice!
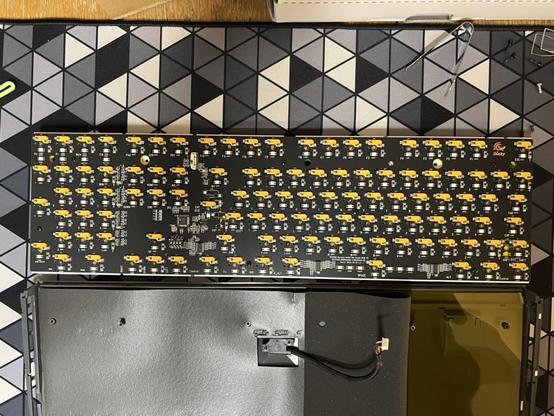
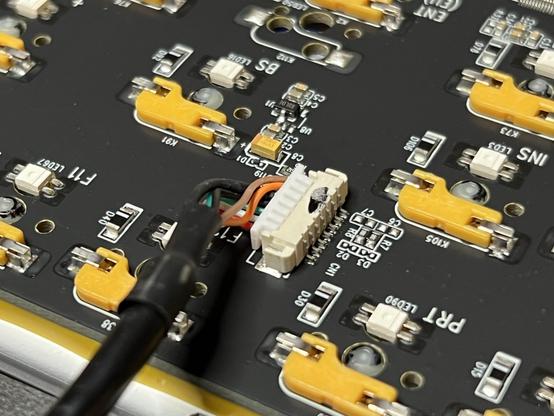
Despite the USB Type-C port poking out of the bottom side of the keyboard, the plate and PCB lift off in the top half, which is connected to the USB Type-C port via a sleeved cable plugged into a JST connector on the PCB. The Type-C port is not PCB mounted, but rather a standalone plastic part screwed into the base. It seems relatively well designed for strain relief and, if it ever breaks, should be easy enough to replace.
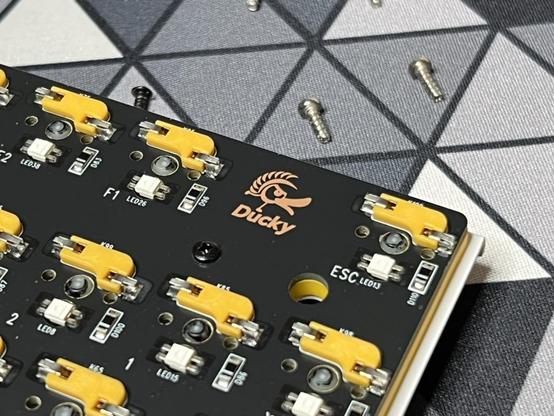
The matching switch sockets are a nice touch. Particularly when most users wont ever see them.
The MX hot-swap sockets are delightfully Ducky yellow, matching the damping material on the reverse of the PCB. This is an extremely nice touch for something you might never see.
Software
In lieu of desktop software the Ducky One 3 Pro includes a comprehensive set of – admittedly difficult to remember – keyboard shortcuts which grant access to everything from recording macros to creating custom, per-key backlighting setups.
This includes changing the polling rate from 1000 Hz to 2000, 4000 or 8000. I tried 8000 on macOS (hold Fn + Alt + 0 until the backlight flashes) and it seemed to still work. I can’t attest to feeling any difference with typing input, though, and since 1000Hz already implies a 1ms latency (it’s probably not that simple) I don’t suspect I’d be able to measure the difference without getting fancy.
another extremely handy feature is the Indicator light brightness adjustment. If the white indicator LEDs on the right-hand side (above the numpad) of the keyboard are obnoxiously bright you can dial them back with Fn + Alt + Down Arrow. Using the up arrow, predictably, does the opposite.
Backlight Setup
I wont cover all of the macro features, but the custom backlight controls are interesting. In addition to an array of built-in patterns for backlighting there are two user-programmable modes: CM1 and CM2.
Backlighting is relatively diffuse, without any in-your-face glare. The aluminium plate doesn't really help, though.
For profile CM1 you hold Fn + AltGr + PrtSc for two to three seconds- or until the Caps Lock key backlight changes.
For CM2 to hold Fn + AltGr + Pause.
While the Ducky One 3 Pro manual says you should hit Caps Lock + Scroll Lock to exit, I found – with trial and error – that I needed to hit Caps Lock + Shift.
Once in the backlight customisation mode you can hit Caps Lock + Spacebar to light the whole keyboard up with a colour palette. Hit the key corresponding to the colour you want and it’ll switch back to a preview of your lighting setup. You can now tap keys to set them to that colour.
This method of setting up backlight colours is particularly intuitive, since often the on-screen colours in backlight utilities don’t quite match what you’ll see on the board. Being able to see the colour palette, pick the colour you want, and get exactly what you asked for is really useful and saves time and hassle dialling in that perfect shade of teal.
The downside is that it’s hard to see if you’ve correctly set your colour of choice on every key, since the backlights are occluded by the keycaps and the light bleeds over enough to fool your eyes. You also can’t set the backlight colour for the extra spacebar LEDs, resulting in some weird (or perhaps desirable?) effects when the built-in backlight pattern shows through your custom one around the spacebar’s edges.
The spacebar gets the treatment it deserves! A generous complement of seven LEDs which give consistent lightning across much more of its length than many setups.
The upside, CM1 and CM2 are layers on top of your normal keyboard backlight pattern. This is a weird concept to wrap your head around, but it means you can set up some custom backlighting for – for example – WASD that you can toggle without affecting whatever rainbow pattern is playing on your keyboard. For better or worse, there’s a lot of backlight tweaking power here for a keyboard that doesn’t need software and I love it.
The DIP Switch
Like the Ducky One 3, the Pro includes the 4 switch DIP on the back. These control Windows Key Lock, N-Key Rollover vs 6-Key Rollover, Ducky vs User VID/PID and finally remapping the right Windows key to be the Menu key.
Return of the DIP!
DIP 1: Windows key lock allows you to lock/unlock the Left/Right Windows keys as you prefer. If you’ve ever been deeply focused in a tense moment of gaming, only to accidentally hit the left Windows key and spawn the Start Menu right over your game… you might be interested in this. Does this even happen anymore!? It strikes me as a very 2000s problem. I found I needed to disconnect/reconnect the keyboard for this feature to work, but with DIP 1 toggled “on” you can hold Fn + Alt + Win for three seconds to disable/enable that specific Windows key. The keyboard backlight will flash white to indicate that the toggle has taken effect.
This DIP also swaps the behaviour of the Windows and Alt keys in macOS, changing the copy shortcut – for example – from Win + C to Alt + C.
DIP 2: The 6-Key switch disables “NKRO” or N-Key Rollover giving better keyboard compatibility for computers that don’t support NKRO in their BIOS. In practice, and as far as I can tell from a little descriptor poking, this changes the “Report Count” for pressed keys from 62 (good luck pressing 62 simultaneous keys) down to just the 6 of a “boot” protocol compatible keyboard. This makes the Ducky One 3 compatible with a fairly universal keyboard standard, intended for situations where full-featured keyboard support would be too complex – or unnecessary – to implement.
DIP 3: The “user-defined” VID feature is another compatibility option. It enables you to enter your own USB Vendor ID and Product ID in order to “trick” your system into loading a specific keyboard driver. This is useful in cases where your system is extraordinarily quirky about keyboard support. While I managed to set the custom VID/PID on the old Ducky One 3 Matcha, the Fn + Alt + P key combo didn’t seem to work here and the manual does not elaborate about which key combo you should use!
DIP 4: Windows to Menu, lets you re-assign the right windows key to the “Menu” key. In Windows (granted I only tested on macOS!) this should be roughly equivalent to a right mouse button click- launching the contextual menu. In macOS is seems to do nothing much at all, though the keypress definitely registers.
Mousekeys
Perhaps one of the more useful features, if you ever use them, is mousekeys. Press Fn + Alt + Num and the numpad becomes a key-actuated mouse. – and + control mouse wheel, Ins and Del are your left/right mouse buttons and the eight numpad keys surrounding 5 become your four cardinal and four intercardinal directions. There is no speed ramping so the cursor crawls ponderously across the screen, and it also takes a moment to get moving, but it’s fast enough to be useful in a pinch.
Overall
The One 3 Pro Nasca Line 100% is another solid offering from Ducky. It’s a small but noticeable upgrade over the original One 3, and the new grey/orange colour scheme is extremely satisfying, especially with an accompanying orange backlight.
Orange. As it should be. Shame about the hotspots on the orange keys though 😬
You’ll absolutely have to delve into the manual to get to grips with the many shortcuts and configuration tweaks you can make, but since the keyboard retains your configuration you’ll only have to do that once.
I was sent the Ducky One 3 Pro with blue switches which currently retails for £149.99, but there are other choices available. < a href="https://www.overclockers.co.uk/?query=ducky%2520one%25203%2520pro">Browse ’em at Overclockers!
